Developer Guide
TutorsPet is a desktop app designed for private tutors in Singapore to manage students’ information, optimized for use via a Command Line Interface (CLI) while still having the benefits of a Graphical User Interface (GUI). TutorsPet helps improve the efficiency and effectiveness of student management by categorizing relevant contact information and keeping track of both lesson schedules and important dates.
Table of Contents
- Table of Contents
- Setting up, getting started
- Design
- Implementation
- Documentation, logging, testing, configuration, dev-ops
- Appendix: Requirements
- Appendix: Instructions for manual testing
Setting up, getting started
Refer to the guide Setting up and getting started.
Design
Architecture

The Architecture Diagram given above explains the high-level design of the App. Given below is a quick overview of each component.
.puml files used to create diagrams in this document can be found in the diagrams folder. Refer to the PlantUML Tutorial at se-edu/guides to learn how to create and edit diagrams.
Main has two classes called Main and MainApp. It is responsible for,
- At app launch: Initializes the components in the correct sequence, and connects them up with each other.
- At shut down: Shuts down the components and invokes cleanup methods where necessary.
Commons represents a collection of classes used by multiple other components.
The rest of the App consists of four components.
-
UI: The UI of the App. -
Logic: The command executor. -
Model: Holds the data of the App in memory. -
Storage: Reads data from, and writes data to, the hard disk.
Each of the four components,
- defines its API in an
interfacewith the same name as the Component. - exposes its functionality using a concrete
{Component Name}Managerclass (which implements the corresponding APIinterfacementioned in the previous point.
For example, the Logic component (see the class diagram given below) defines its API in the Logic.java interface and exposes its functionality using the LogicManager.java class which implements the Logic interface.

How the architecture components interact with each other
The Sequence Diagram below shows how the components interact with each other for the scenario where the user issues the command delete 1.

The sections below give more details of each component.
UI component

API :
Ui.java
The UI consists of a MainWindow that is made up of parts e.g.CommandBox, ResultDisplay, PersonListPanel, StatusBarFooter etc. All these, including the MainWindow, inherit from the abstract UiPart class.
The UI component uses JavaFx UI framework. The layout of these UI parts are defined in matching .fxml files that are in the src/main/resources/view folder. For example, the layout of the MainWindow is specified in MainWindow.fxml
The UI component,
- Executes user commands using the
Logiccomponent. - Listens for changes to
Modeldata so that the UI can be updated with the modified data.
Logic component

API :
Logic.java
-
Logicuses theAddressBookParserclass to parse the user command. - This results in a
Commandobject which is executed by theLogicManager. - The command execution can affect the
Model(e.g. adding a person). - The result of the command execution is encapsulated as a
CommandResultobject which is passed back to theUi. - In addition, the
CommandResultobject can also instruct theUito perform certain actions, such as displaying help to the user.
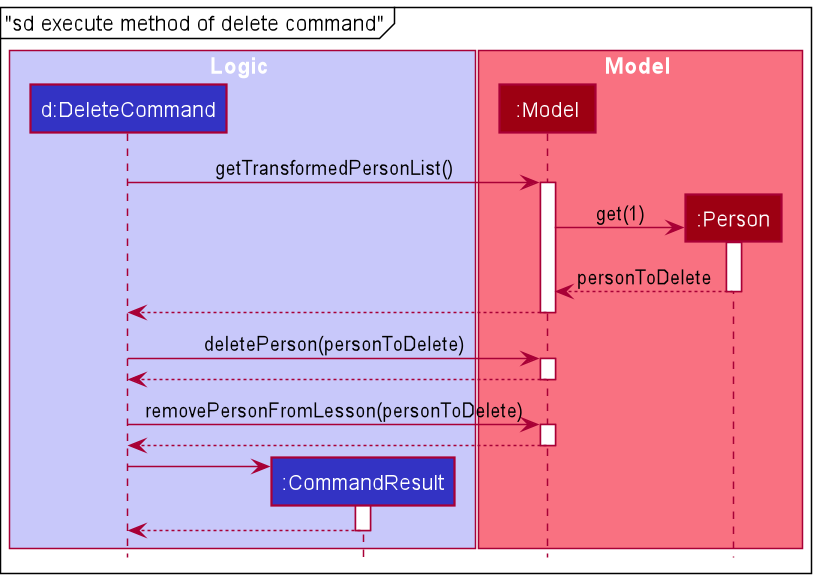
Refer to the Sequence Diagrams in the implementation of the delete command for interactions within the Logic component for the execute("delete 1") API call.
DeleteCommandParser should end at the destroy marker (X) but due to a limitation of PlantUML, the lifeline reaches the end of diagram.
Model component

API : Model.java
The Model,
- stores a
UserPrefobject that represents the user’s preferences. - stores the TutorsPet data.
- stores a Person object that represents a student
- stores an ImportantDate object
-
stores a Lesson object
- exposes an unmodifiable
ObservableList<Person>,ObservableList<ImportantDate>andObservableList<Lesson>that can be ‘observed’.- UI bounded to these lists and Person, ImportantDate, Lesson objects will be automatically updated when the data in the list changes.
- does not depend on any of the other three components.
Storage component

API : Storage.java
The Storage component,
- can save
UserPrefobjects in json format and read it back. - can save the address book data in json format and read it back.
- can save the dates book data in json format and read it back.
- can save the lesson book data in json format and read it back.
Common classes
Classes used by multiple components are in the seedu.addressbook.commons package.
Implementation
This section describes some noteworthy details on how certain features are implemented.
Add feature
Implementation
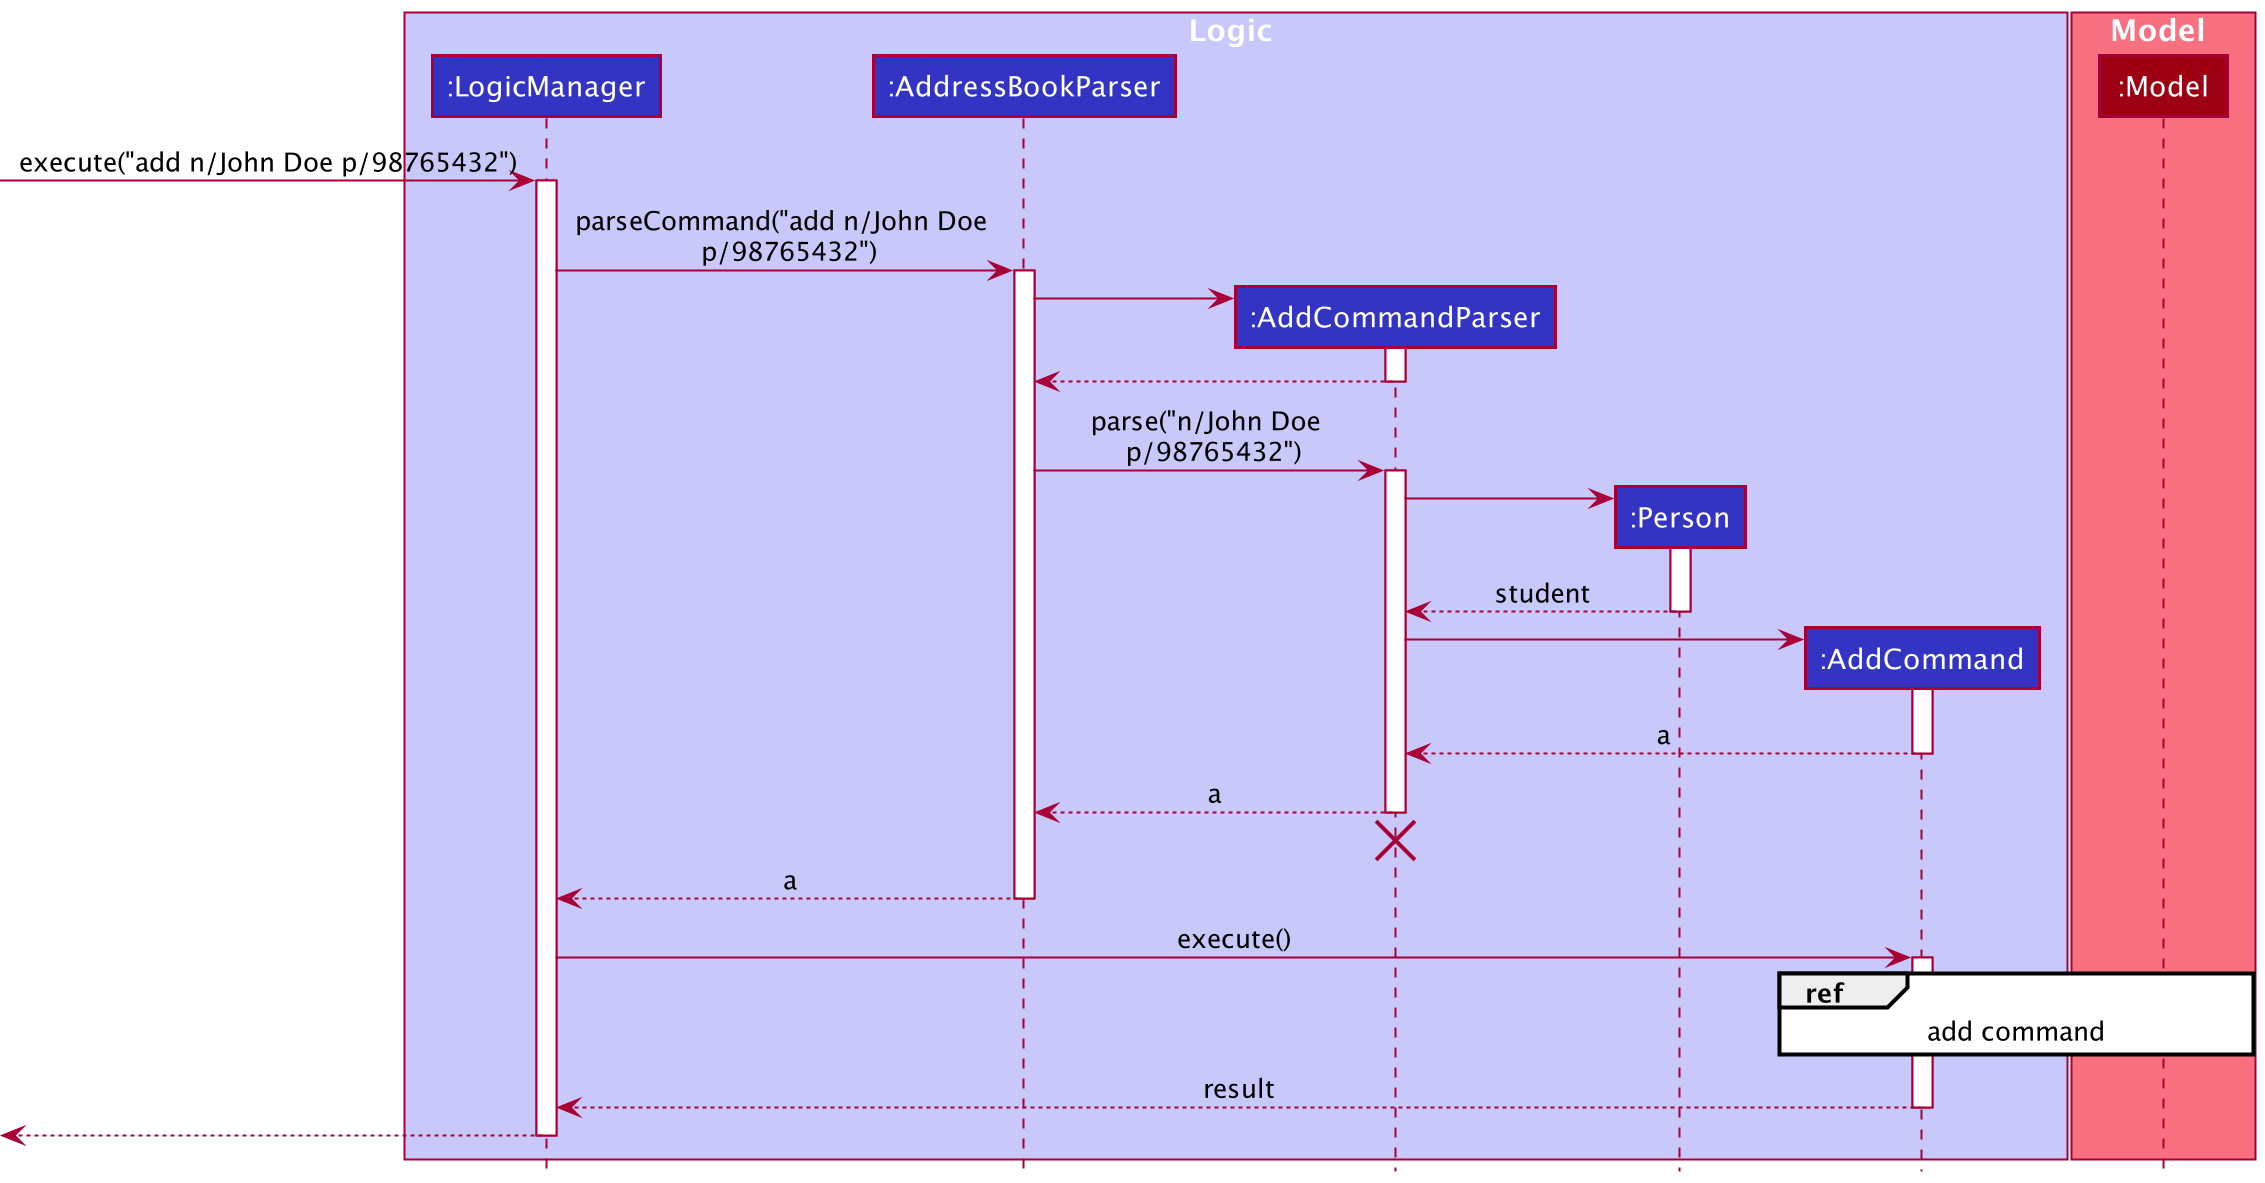
The add mechanism is facilitated by AddCommand and AddCommandParser.
AddCommand extends Command and implements the following operation:
-
AddCommand#execute()— adds the student with personal details if the details are valid, and returns a newCommandResultwith a success message.
AddCommandParser implements the Parser interface and implements the following operation:
-
AddCommandParser#parse()— parses the user’s input and returns aAddCommandif the command format is valid
Given below is an example usage scenario and how the add mechanism behaves at each step.
Step 1. The user executes add n/John Doe p/98765432 command to add a new student who is called John Doe
and has a phone number of 98765432 in TutorsPet.
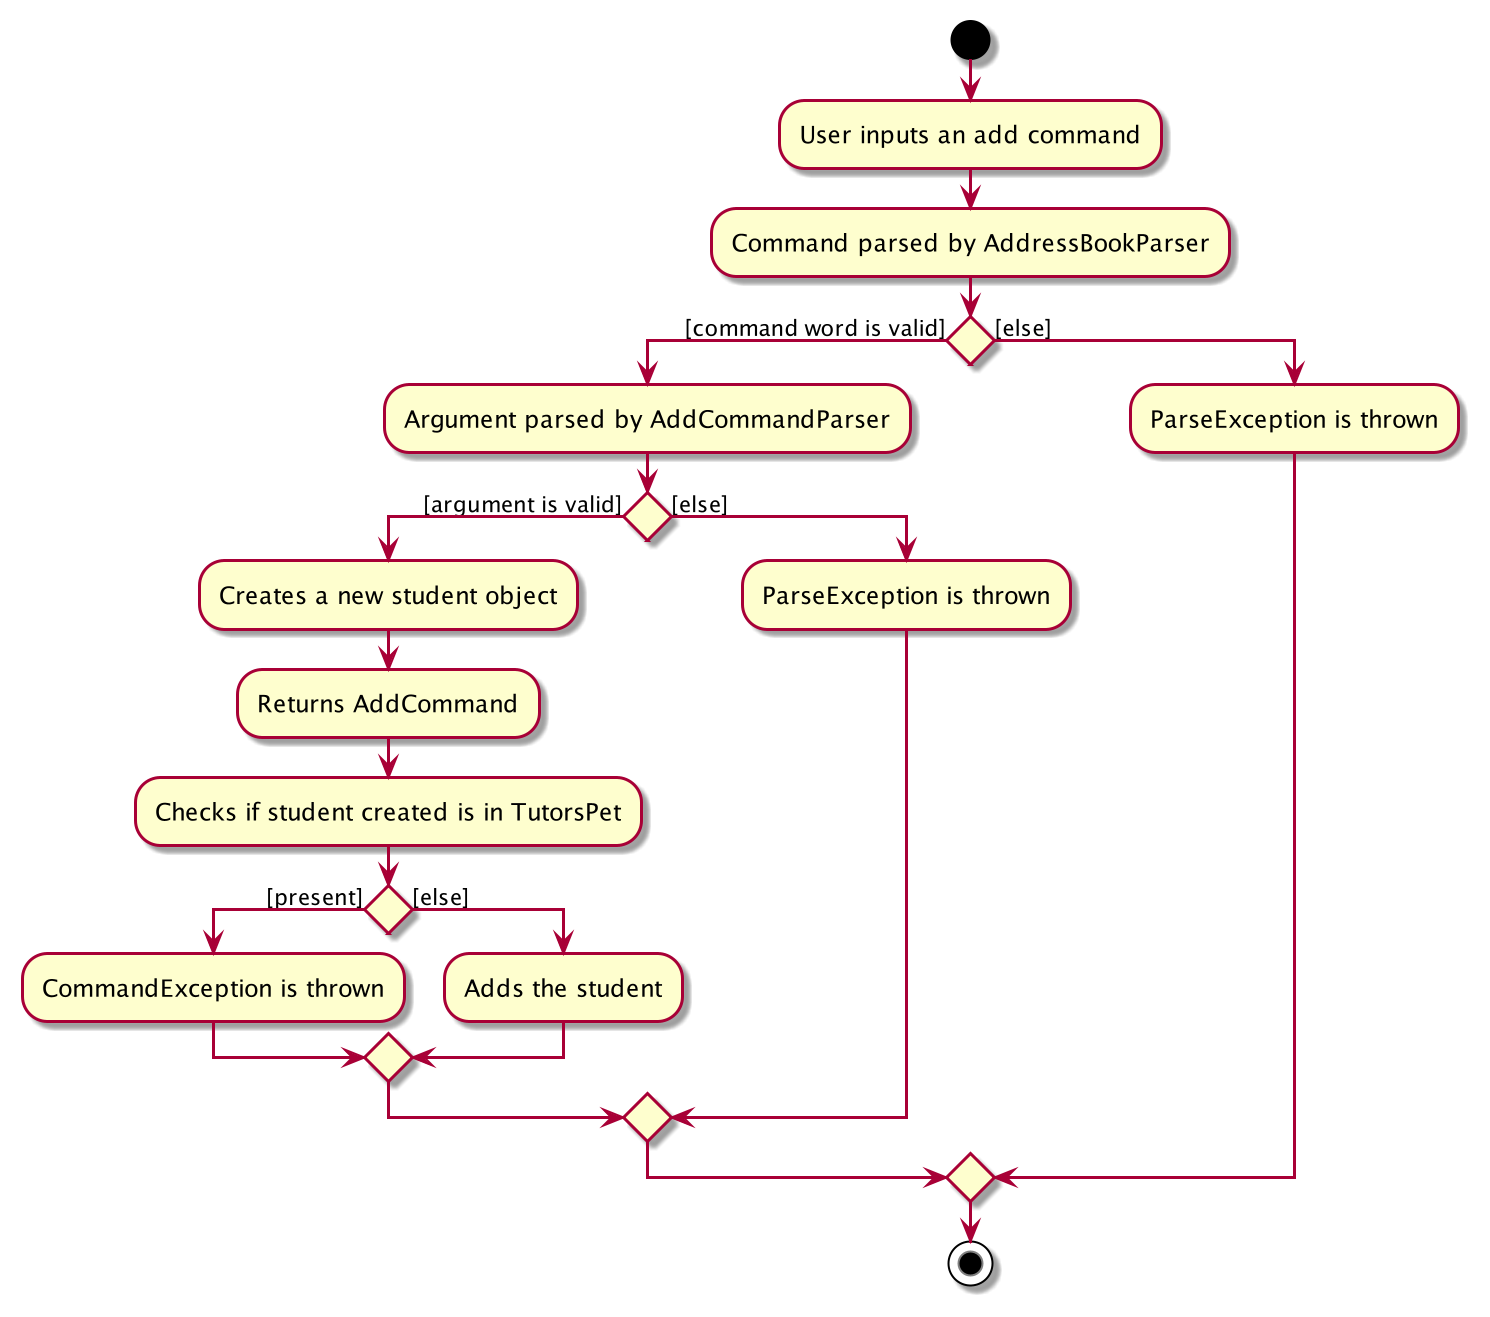
Step 2. The user input is parsed by AddressBookParser, which passes the add command’s argument to AddCommandParser.
Step 3. AddCommandParser creates a new Person object for the new student and returns a new AddCommand
if the argument is valid. Otherwise, a ParseException is thrown.
Step 4. LogicManager then calls AddCommand#execute().
Step 5. AddCommand#execute() checks if the student represented by the Personobject exists.
If the student does not exist, he/she gets added and a new CommandResult is returned.
Otherwise, a CommandException is thrown.
Step 6. If the add command has been successfully executed, the success message will be displayed.
The sequence diagram below shows how the add feature works:
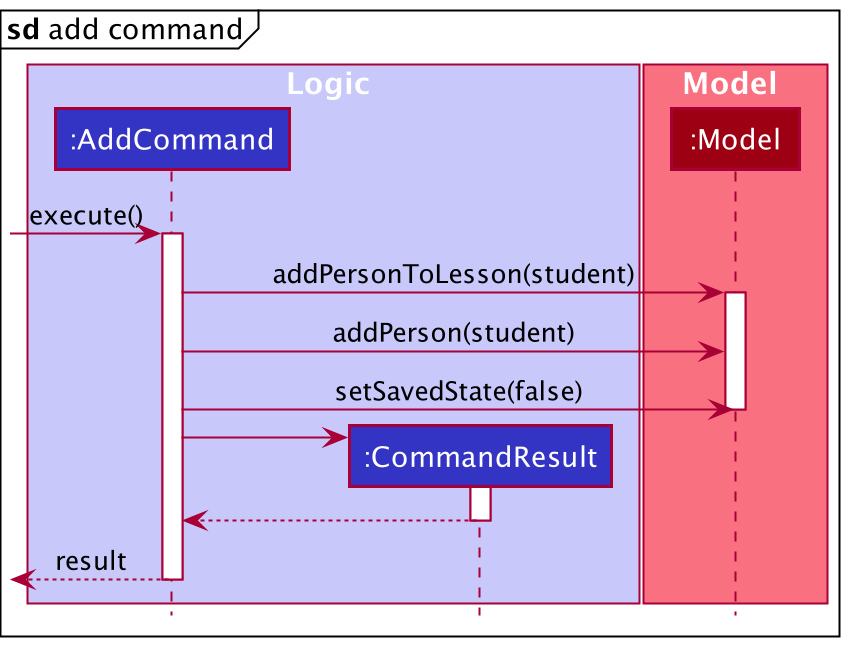
The activity diagram shows the workflow when an add command is executed:
Design consideration:
Aspect: Whether to allow incomplete fields(i.e. some personal details can be missing when adding a new student)
-
Alternative 1 (current choice): Certain fields are optional when a new student are added.
- Pros: More flexible and user-friendly.
- Cons: It may take some time to add in the missing fields in the future.
-
Alternative 2: All fields of a student must be added at first.
- Pros: More standardized and easier to track.
- Cons: Certain fields of a new student may not be known by the user at once.
Edit feature
Implementation
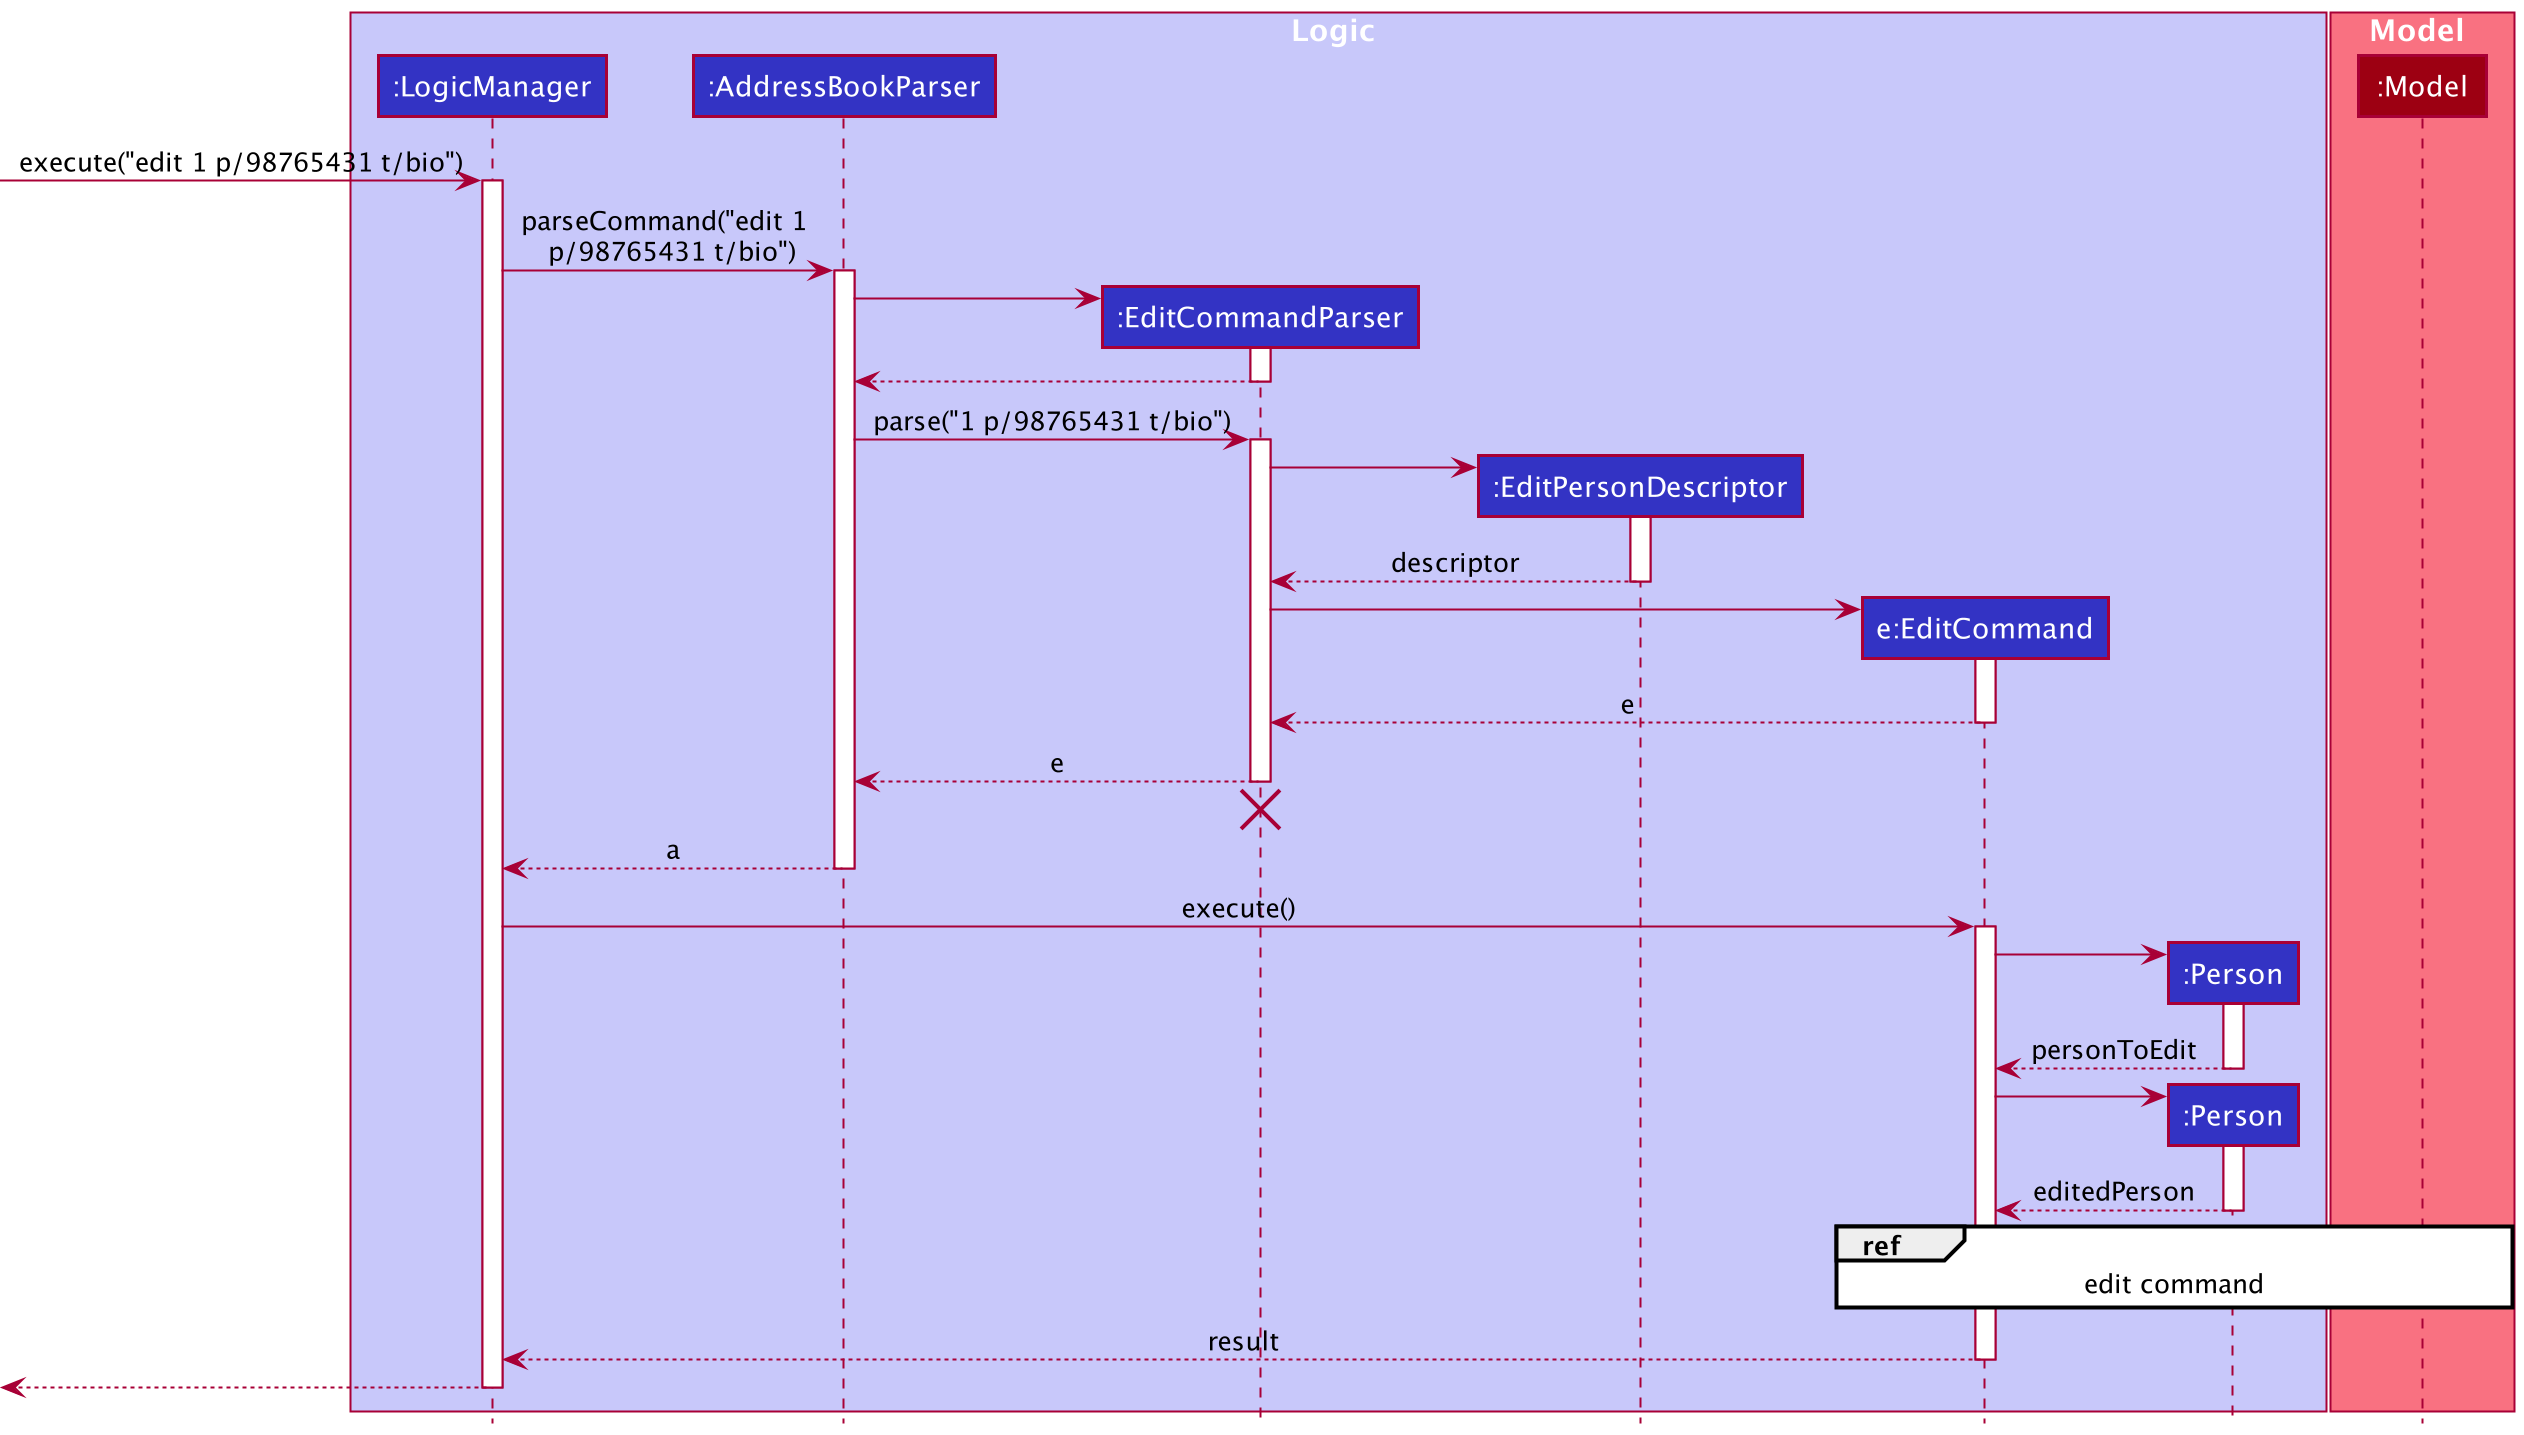
The edit mechanism is facilitated by EditCommand and EditCommandParser.
EditCommand extends Command and implements the following operation:
-
EditCommand#execute()— edits the student with new personal details if the details are valid, and returns a newCommandResultwith a success message.
EditCommandParser implements the Parser interface and implements the following operation:
-
EditCommandParser#parse()— parses the user’s input and returns aEditCommandif the command format is valid.
Given below is an example usage scenario and how the edit mechanism behaves at each step.
add n/John Doe p/98765432 and is currently the 1st student in TutorsPet.
Then, the information of John Doe is edited. Here, an example of the student’s phone being changed and the student’s subject being added with edit command is used.
Step 1. The user executes edit 1 p/98765431 t/bio command to edit the existing student John Doe
to change his phone number and add in his subject.
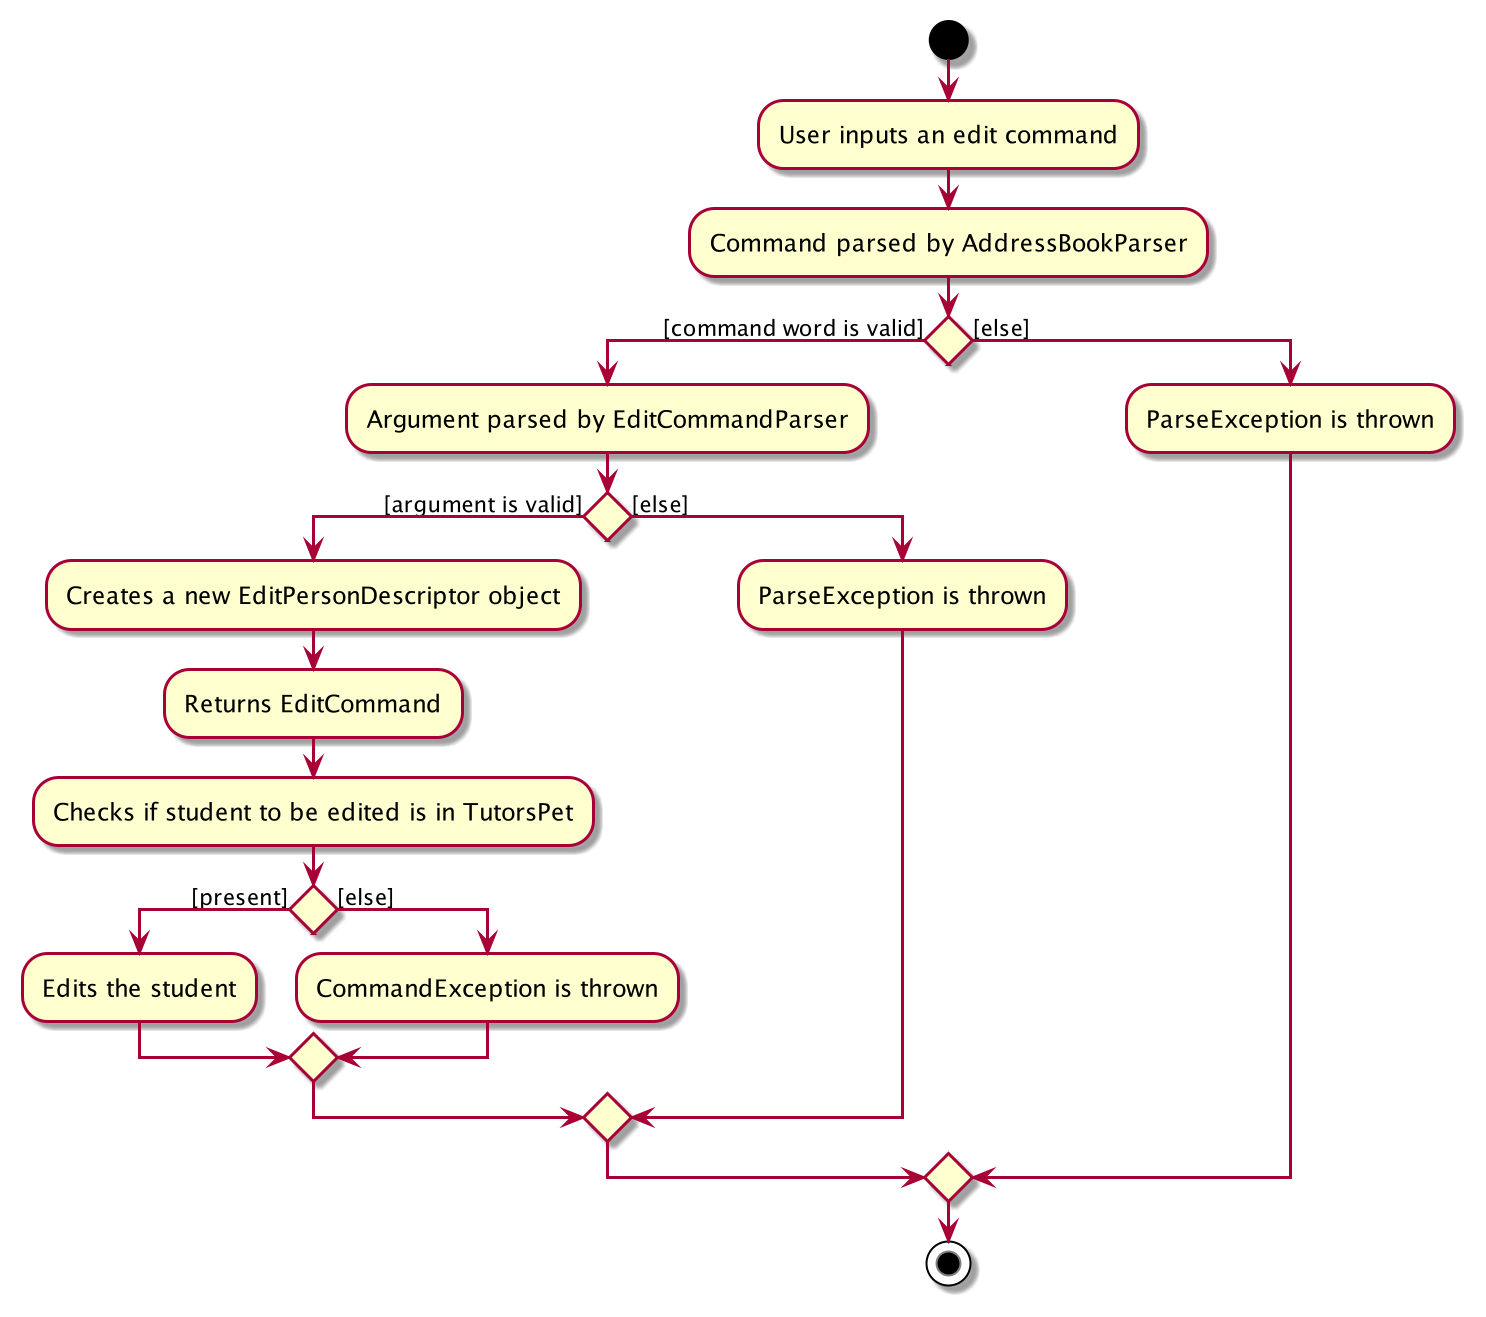
Step 2. The user input is parsed by AddressBookParser, which passes the edit command’s argument to EditCommandParser.
Step 3. EditCommandParser creates a new EditPersonDescriptor object to include the new values of the fields to be changed to.
The student index 1 and the EditPersonDescriptor object are passed into the SearchCommand constructor as the arguments, if they are valid.
Otherwise, a ParseException is thrown.
Step 4. LogicManager then calls EditCommand#execute().
Step 5. EditCommand#execute() checks if the student represented by the Personobject exists.
If the student does not exist, he/she gets added and a new CommandResult is returned.
Otherwise, a CommandException is thrown.
Step 6. If the edit command has been successfully executed, the success message will be displayed.
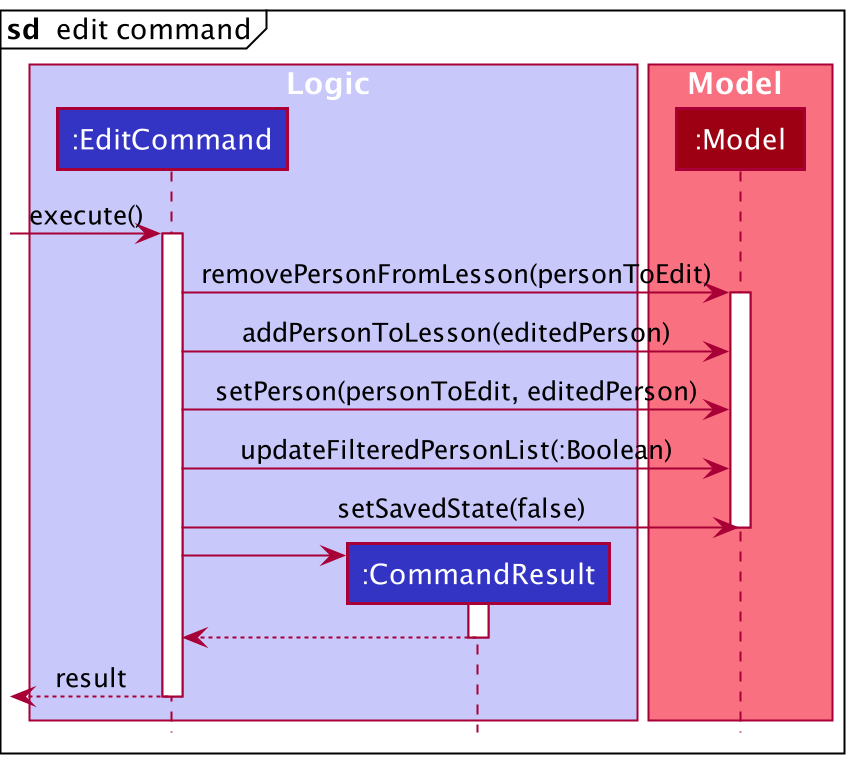
The sequence diagram below shows how the edit feature works:
The activity diagram shows the workflow when a edit command is executed:
Design consideration:
Aspect: Whether to enable every optional field to clear the current values under a field with blank space after its prefix
-
Alternative 1 (current choice): Only subjects and lessons can be cleared by
editcommand with blank space after their respective prefixes.- Pros: Fewer fields need to be taken care of and are easier to remember. Subjects and lessons taken by the students could be removed.
- Cons: Deletion of a wrong piece of information is disallowed once it is stored in TutorsPet and no new information is available. It might cause confusion in the future.
-
Alternative 2: All the optional fields of a student can be cleared by
editcommand with blank space after their respective prefixes.- Pros: User can alter students’ information more freely.
- Cons: User might lose track of important personal details if they accidentally leave the field blank after any prefix.
Delete feature
Implementation
The delete mechanism is facilitated by DeleteCommand and DeleteCommandParser.
DeleteCommand extends Command and implements the following operation:
-
DeleteCommand#execute()— deletes the student at the given index if the index is valid, and returns a newCommandResultwith a success message.
DeleteCommandParser implements the Parser interface and implements the following operation:
-
DeleteCommandParser#parse()— parses the user’s input and returns aDeleteCommandif the command format is valid
Given below is an example usage scenario and how the delete mechanism behaves at each step.
Step 1. The user executes delete 1 command to delete the 1st student in TutorsPet.
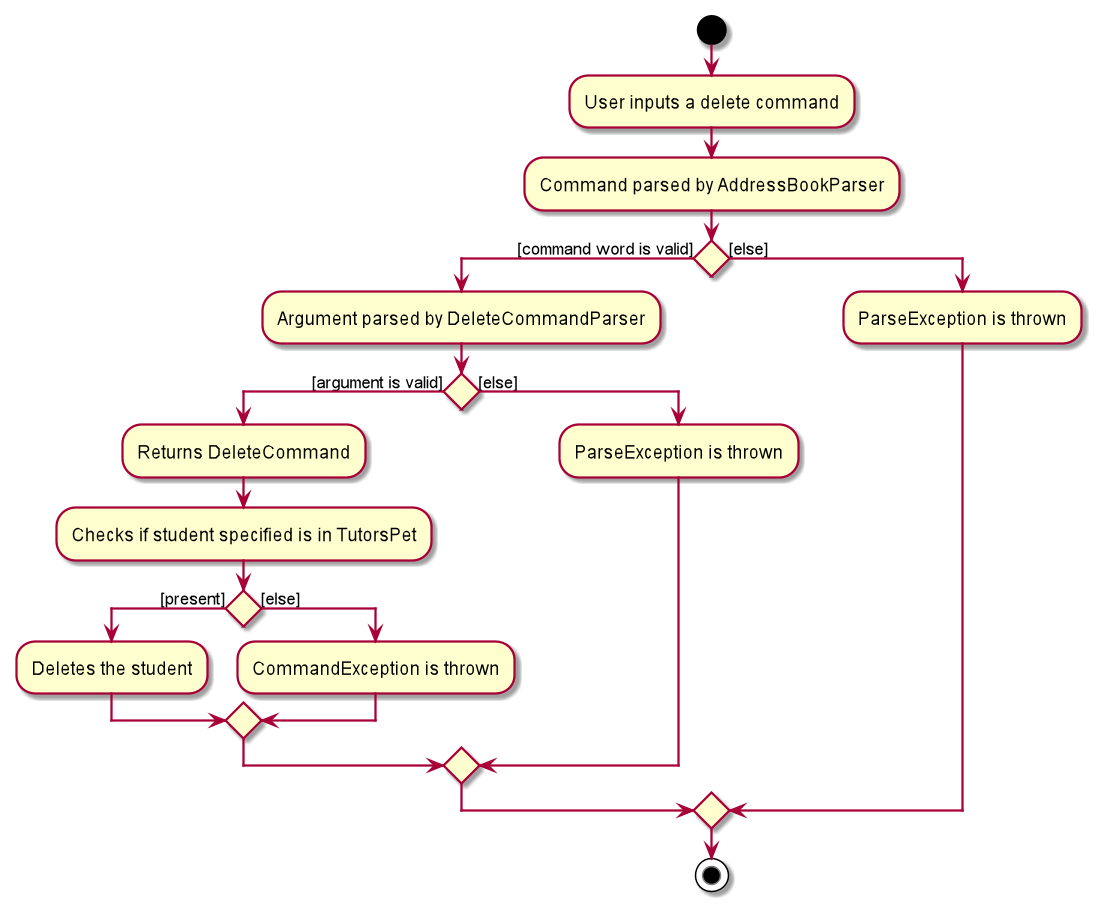
Step 2. The user input is parsed by AddressBookParser, which passes the delete command’s argument to DeleteCommandParser.
Step 3. DeleteCommandParser returns a new DeleteCommand if the argument is valid. Otherwise, a ParseException is thrown.
Step 4. LogicManager then calls DeleteCommand#execute().
Step 5. DeleteCommand#execute() checks if the student specified exists. If the student exists, he/she gets deleted and
a new CommandResult is returned. Otherwise a CommandException is thrown.
Step 6. If the delete command has been successfully executed, the success message will be displayed.
The sequence diagram below shows how the delete feature works:

The activity diagram shows the workflow when a delete command is executed:
Design consideration:
Aspect: Whether to provide options to delete specific fields
-
Alternative 1 (current choice): Deletes the entire Student object.
- Pros: Easy to implement, less prone to errors.
- Cons: Less flexibility.
-
Alternative 2: Provide options to delete specific fields that belong to a Student.
- Pros: Unnecessary information can be removed easily.
- Cons: Certain fields such as subjects and lessons can already be cleared easily with the
editcommand.
Detail feature
Implementation
The detail mechanism is facilitated by DetailCommand and DetailCommandParser.
DetailCommand extends Command and implements the following operation:
-
DetailCommand#execute()— displays the details of the student at the given index if the index is valid, and returns a newCommandResultwith a success message.
DetailCommandParser implements the Parser interface and implements the following operation:
-
DetailCommandParser#parse()— parses the user’s input and returns aDetailCommandif the command format is valid
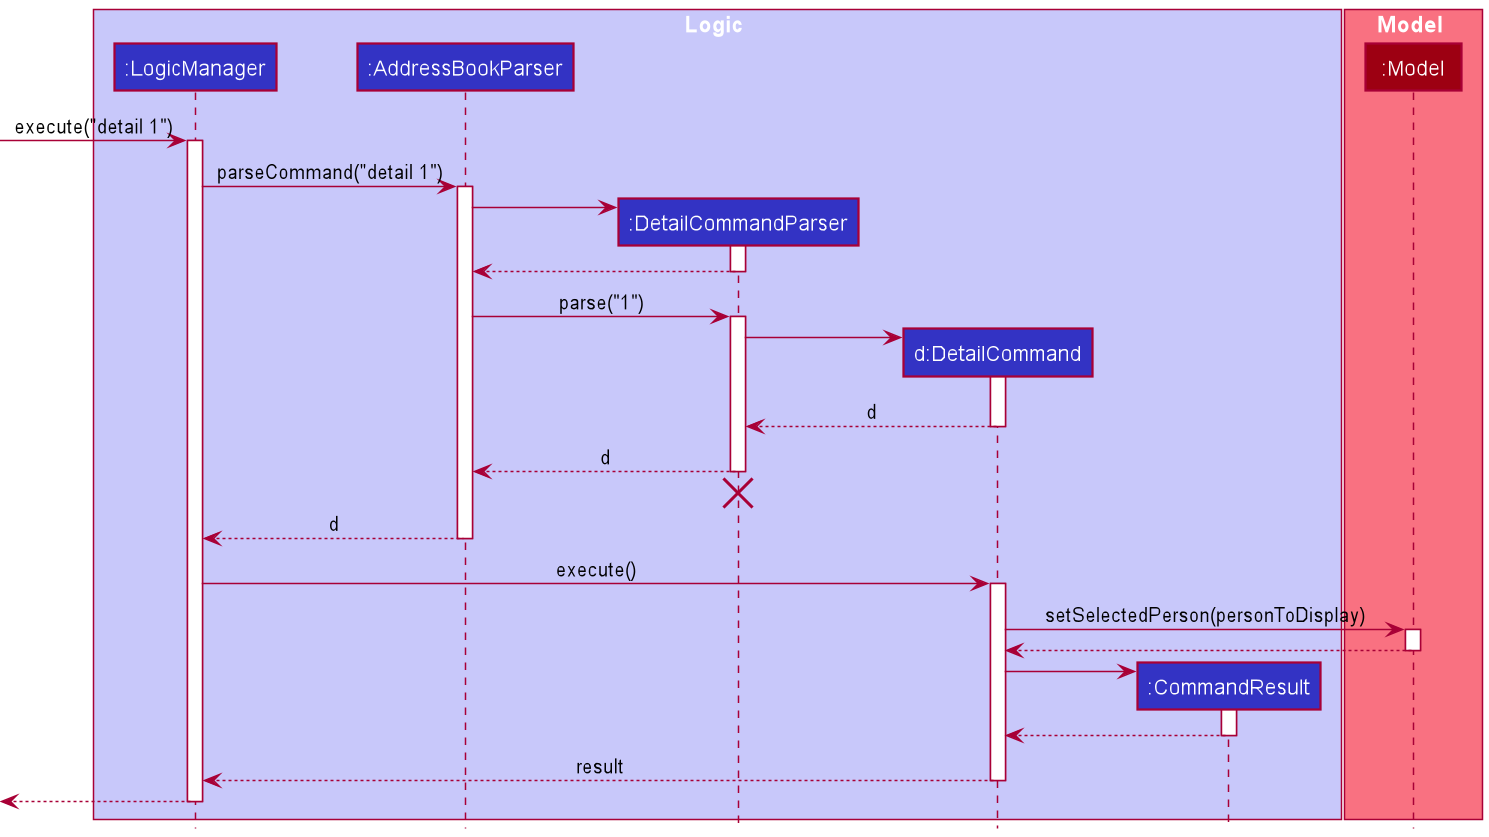
Given below is an example usage scenario and how the detail mechanism behaves at each step.
Step 1. The user executes detail 1 command to display the details of the 1st student in TutorsPet.
Step 2. The user input is parsed by AddressBookParser, which passes the detail command’s argument to DetailCommandParser.
Step 3. DetailCommandParser returns a new DetailCommand if the argument is valid. Otherwise, a ParseException is thrown.
Step 4. LogicManager then calls DetailCommand#execute().
Step 5. DetailCommand#execute() checks if the student specified exists. If the student exists, his/her details will
get displayed and a new CommandResult is returned. Otherwise, a CommandException is thrown.
Step 6. If the detail command has been successfully executed, the success message will be displayed.
The sequence diagram below shows how the detail feature works:
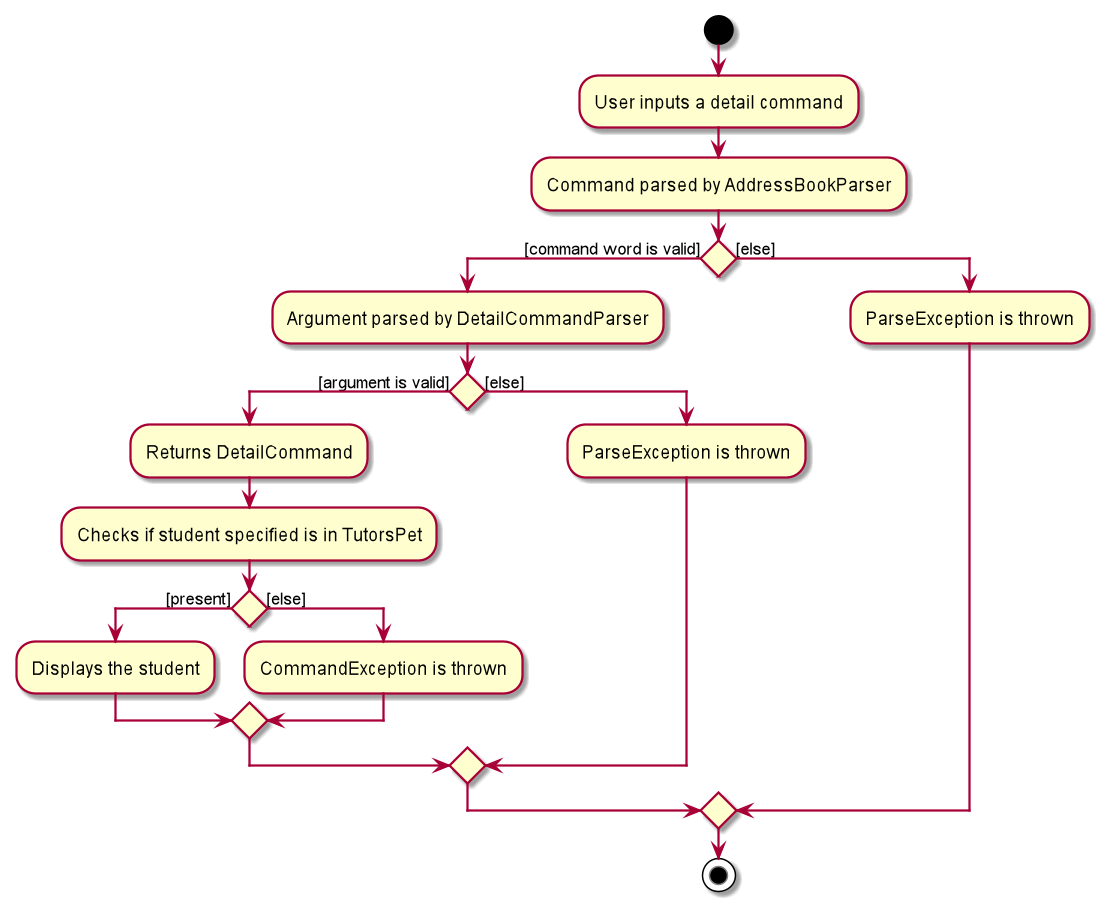
The activity diagram shows the workflow when a detail command is executed:
Design consideration:
Aspect: Whether to provide options to display multiple contacts
-
Alternative 1 (current choice): Display one Student object.
- Pros: Easy to implement, less prone to errors.
- Cons: Less flexibility.
-
Alternative 2: Provide options to display multiple Students objects.
- Pros: Able to user to multi-task.
- Cons: GUI space restriction.
Search feature
Implementation
The search mechanism is facilitated by SearchCommand, SearchCommandParser and NameSchoolAndSubjectContainsKeywordsPredicate.
SearchCommand extends Command and contains a Predicate. It implements the following operation:
-
SearchCommand#execute()— displays a list of students whose name, school or tag matches the keywords following the prefixes n/ s/ t/ respectively in the search command. Returns a newCommandResultwith a message indicating the number of students found.
SearchCommandParser implements the Parser interface and implements the following operation:
-
SearchCommandParser#parse()— parses the user’s input and returns a newSearchCommandwith a newNameSchoolAndSubjectContainsKeywordsPredicateas argument if the command format is valid. -
SearchCommandParser#extractKeywordsAsArray()— extracts the keywords following a prefix that is passed as parameter into an array.
NameSchoolAndSubjectContainsKeywordsPredicate implements the Predicate interface and contains 3 List of keywords: name, school and subject. It implements the following operations:
-
NameSchoolAndSubjectContainsKeywordsPredicate#test()— tests if the name, school and tag keywords matches the name, school and subjects of the student contacts respectively, and returns true if matches. -
NameSchoolAndSubjectContainsKeywordsPredicate#testBySubject()— tests if the subject keywords matches the subjects of the student. -
NameSchoolAndSubjectContainsKeywordsPredicate#testBySchool()— tests if the school keywords matches the school of the student. -
NameSchoolAndSubjectContainsKeywordsPredicate#testByName()— tests if the name keywords matches the name of the student.
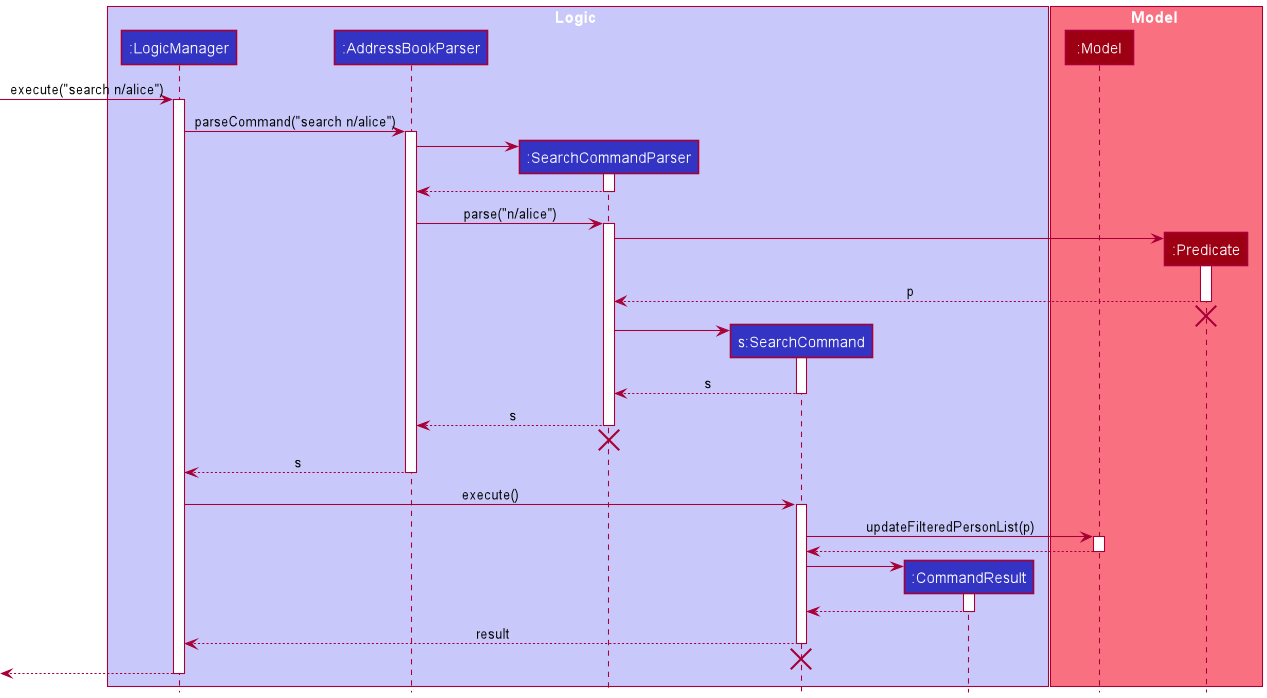
Given below is an example usage scenario and how the search mechanism behaves at each step.
Step 1. The user executes search n/alice t/math command to search for students with the name alice or with the subject math, both case insensitive.
Step 2. LogicManager#execute() is called to execute the given command. It first calls AddressBookParser#parseCommand() which passes the command’s argument SearchCommandParser#parse() to parse the search command.
Step 3. SearchCommandParser#parse() calls SearchCommandParser#extractKeywordsAsArray() to obtain the name, school and subject keywords in separate List.
A new NameSchoolAndSubjectContainsKeywordsPredicate is created using the 3 keyword lists, and is passed into the SearchCommand constructor as the argument.
The new SearchCommand is then returned if the argument is valid with the correct prefixes. Otherwise, a ParseException is thrown.
Step 4. After the new SearchCommand is returned, the LogicManager#execute() continues and calls SearchCommand#execute().
Step 5. SearchCommand#execute() filters the filtered person list by passing the NameSchoolAndSubjectContainsKeywordsPredicate argument into Model#updateFilteredPersonList().
The updated filtered person list with the search results will then be displayed.
Step 6. If the search command has been successfully executed, a message will be displayed indicating the number of person listed.
The sequence diagram below shows how the search feature works:
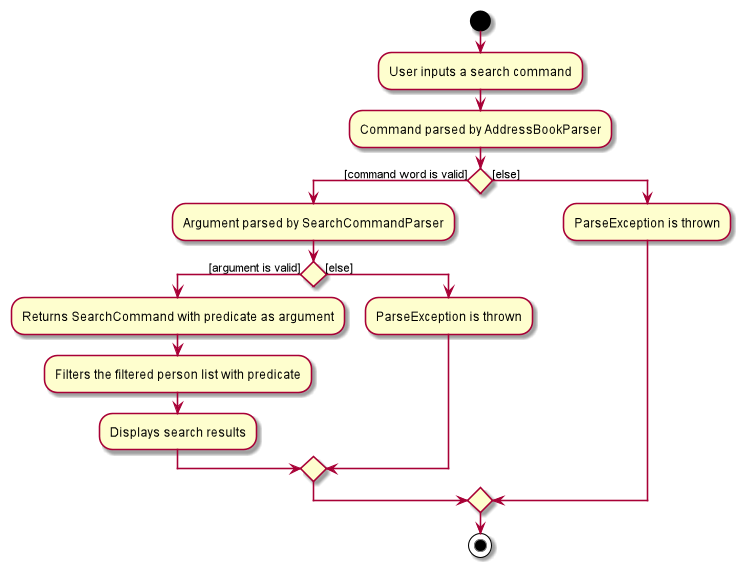
The activity diagram shows the workflow when a search command is executed:
Design consideration:
Aspect: Whether to use prefix in the search command.
-
Alternative 1 (current choice): Use prefix to indicate the aspect to be searched.
- Pros: Results in a more accurate search result.
- Cons: Less flexibility.
-
Alternative 2: Search using general keywords without use of prefix.
- Pros: Allows for a more general search which searches through all the contact’s details. Easier to implement, less prone to errors.
- Cons: Less accurate search result due to nature of contact details. For example a student’s name and a guardian’s name might be the same.
Sort feature
Implementation
The search mechanism is facilitated by SortCommand and SortCommandParser.
SortCommand extends Command and contains a Predicate and a Comparator. It implements the following operation:
-
SortCommand#execute()— displays a list of students who has been sorted according to either their name, school, subject or lesson if the sorting prefix is valid, then returns a newCommandResultwith a message indicating how the list has been sorted, and the number of students displayed.
SortCommandParser implements the Parser interface and implements the following operation:
-
SortCommandParser#parse()— parses the user’s input and returns a newSortCommandwith the prefix specified by the user.
Given below is an example usage scenario and how the sort mechanism behaves at each step.
Step 1. The user executes sort n/ command to sort students by the alphabetical order of their Name.
Step 2. The user input is parsed by AddressBookParser, which passes the sort command’s argument to SortCommandParser.
Step 3. SortCommandParser returns a new SortCommand if the argument is valid. Otherwise, a ParseException is thrown.
Step 4. SortCommand internally assigns the appropriate comparator and predicate to its fields.
Step 5. LogicManager then calls SortCommand#execute().
Step 6. SortCommand#execute() uses the right comparator and predicate according to its fields and
a new CommandResult is returned.
Step 7. If the sort command has been successfully executed, the success message will be displayed.
The sequence diagram below shows how the sort feature works:
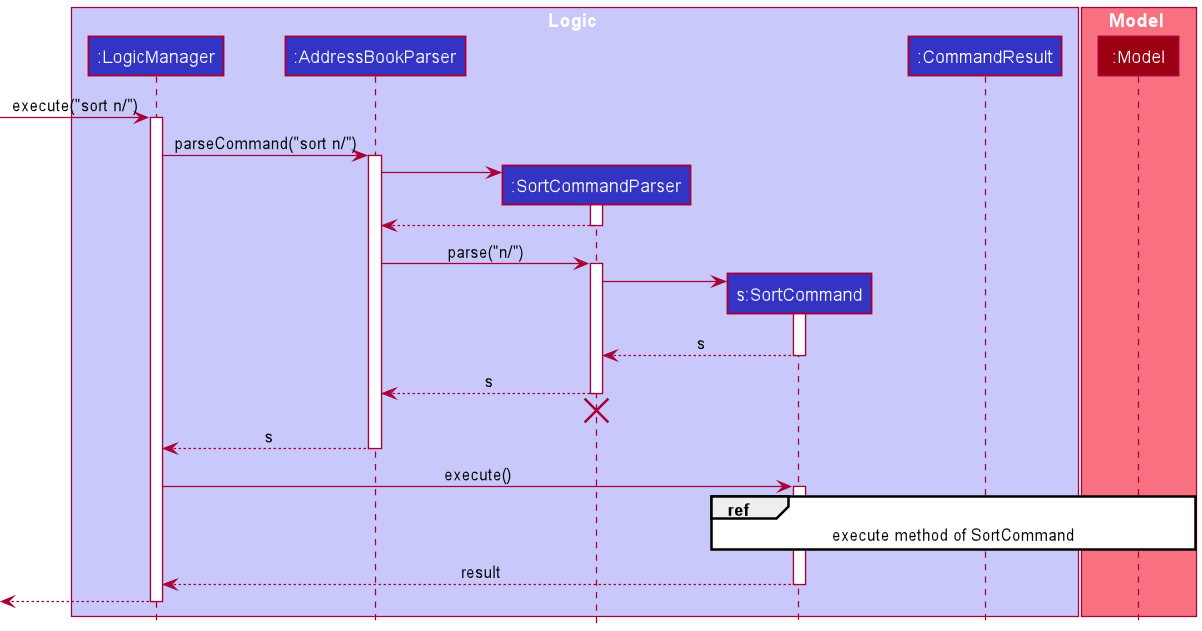
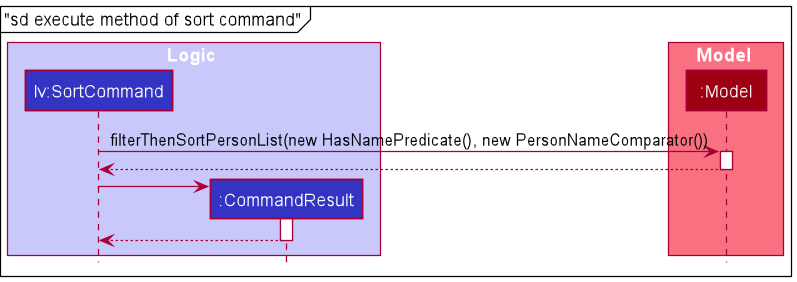
The activity diagram shows the workflow when a sort command is executed:
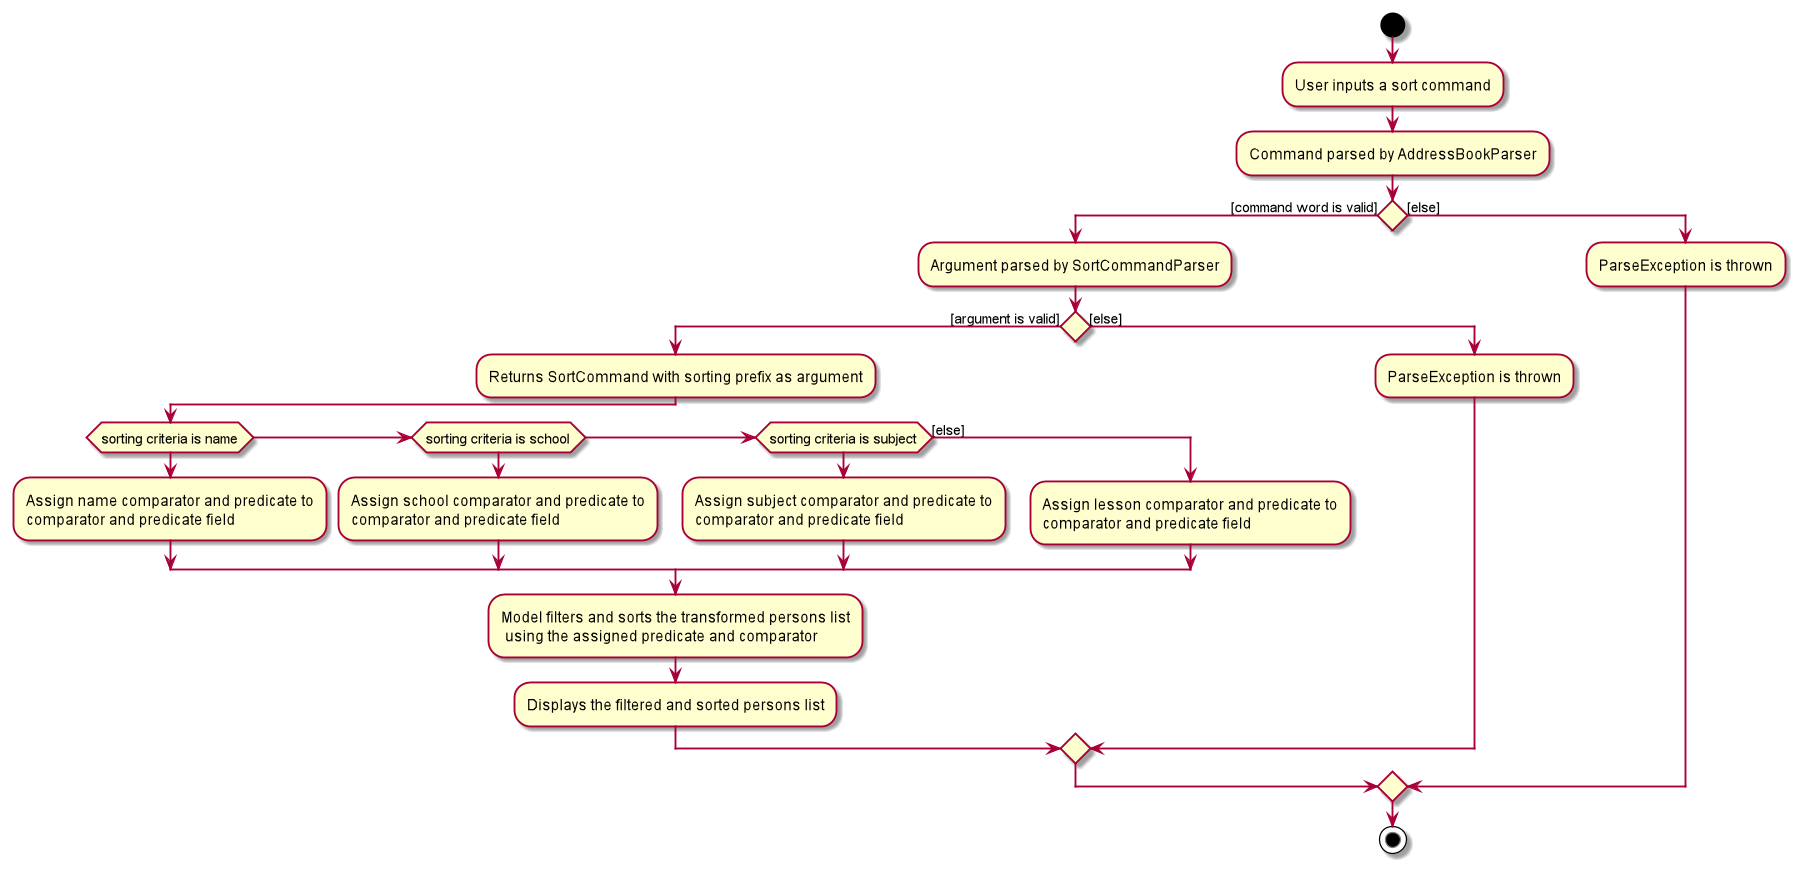
Design consideration:
Aspect: Whether to display students without the attribute to be sorted as well.
-
Alternative 1 (current choice): Filter out students without the attribute to be sorted.
- Pros: Neater results list.
- Cons: List is not complete.
-
Alternative 2: Leave all the students without the attribute to be sorted in the list display,
perhaps at the start or end of the list.
- Pros: List shows all the students every time.
- Cons: Might clutter the GUI with people the user does not want to see.
Level Up feature
Implementation
The advancing education levels mechanism is facilitated by LevelUpCommand and LevelUpCommandParser.
LevelUpCommand extends Command and implements the following operation:
-
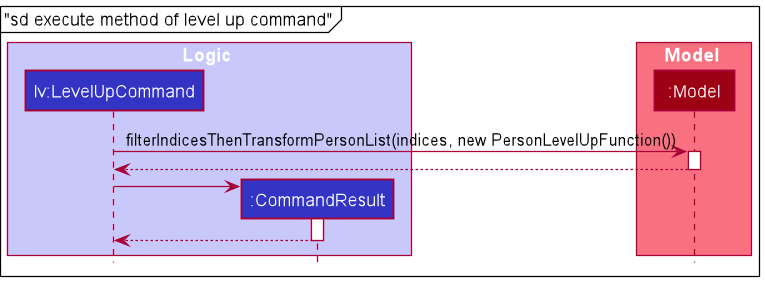
LevelUpCommand#execute()— advances all the student by one education level, unless students are excluded, and returns a newCommandResultwith a success message.
LevelUpCommandParser implements the Parser interface and implements the following operation:
-
LevelUpCommandParser#parse()— parses the user’s exclusions (if any) and returns aLevelUpCommandif the command format is valid
Given below is an example usage scenario and how the advancing mechanism behaves at each step.
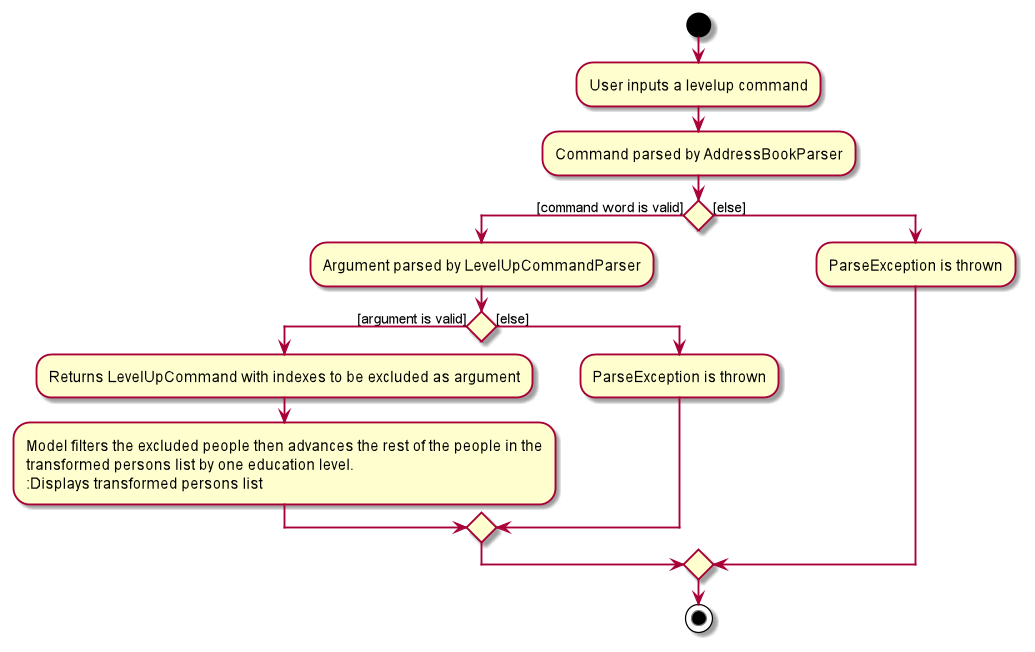
Step 1. The user executes levelup ex/1 command to advance all the students except the 1st student by
one education level in TutorsPet.
Step 2. The user input is parsed by AddressBookParser, which passes the advancing command’s argument to LevelUpCommandParser.
Step 3. LevelUpCommandParser returns a new LevelUpCommand with a lists of excluded indexes if the argument is valid.
Otherwise, a ParseException is thrown.
Step 4. LogicManager then calls levelUpCommand#execute().
Step 5. LevelUpCommand#execute() checks if the indexes correspond to valid students, then the rest of the students
are advanced by one education level. Otherwise, a CommandException is thrown.
Step 6. If the advancing command has been successfully executed, the success message will be displayed.
The sequence diagram below shows how the levelup feature works:
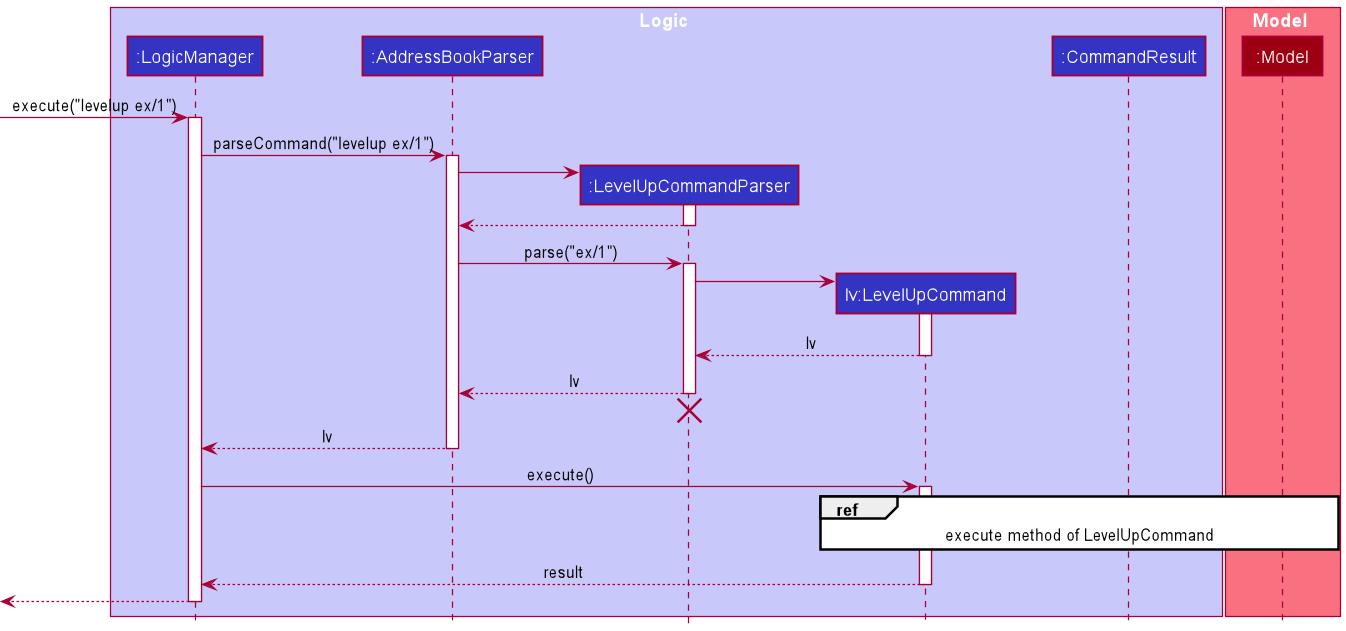
The activity diagram shows the workflow when a levelup command is executed:
Design consideration:
Aspect: Whether to also add an option to only advance some students
-
Alternative 1 (current choice): Only have option to exclude students and not include students.
- Pros: Fits the purpose of the command, which is to advance all students at the start of the year, except for those who retain a year.
- Cons: Does not cover the case where most of the students end up retaining.
-
Alternative 2: Provide the option to include students as well.
- Pros: Allows for the mass advancement of a group of students that is still smaller than the majority.
- Cons: Seems redundant, cases where a majority of the students do not advance is slim.
Level Down feature
Implementation
The demoting education levels mechanism is facilitated by LevelDownCommand and LevelDownCommandParser.
LevelDownCommand extends Command and implements the following operation:
-
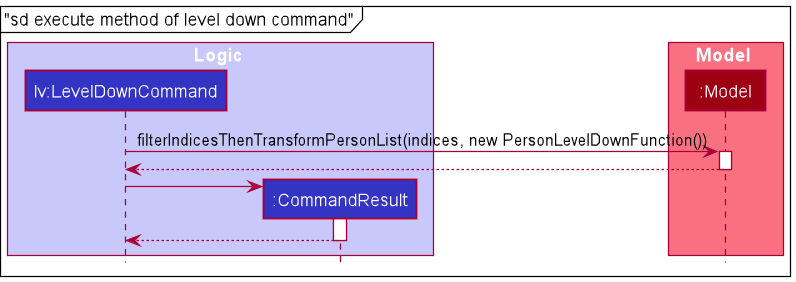
LevelDownCommand#execute()— demotes all the student by one education level, unless students are excluded, and returns a newCommandResultwith a success message.
LevelDownCommandParser implements the Parser interface and implements the following operation:
-
LevelDownCommandParser#parse()— parses the user’s exclusions (if any) and returns aLevelDownCommandif the command format is valid
Given below is an example usage scenario and how the advancing mechanism behaves at each step.
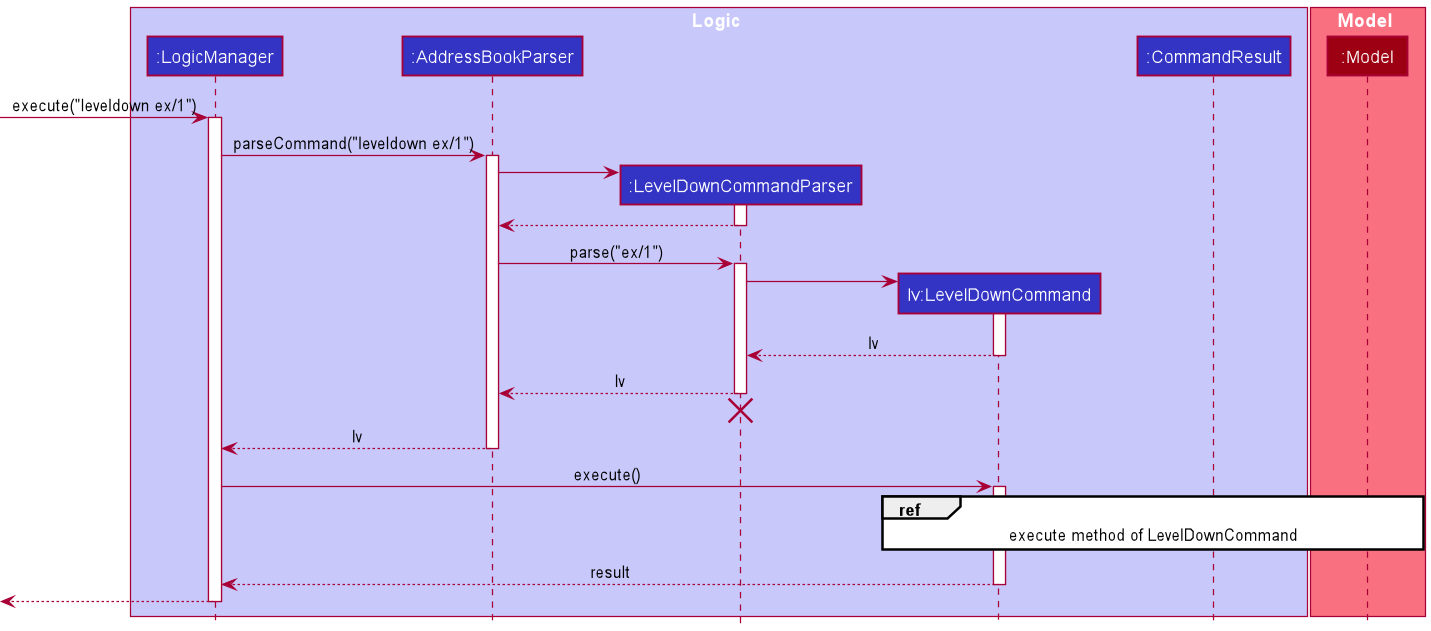
Step 1. The user executes leveldown ex/1 command to demote all the students except the 1st student by
one education level in TutorsPet.
Step 2. The user input is parsed by AddressBookParser, which passes the advancing command’s argument to LevelUpCommandParser.
Step 3. LevelDownCommandParser returns a new LevelDownCommand with a lists of excluded indexes if the argument is valid.
Otherwise, a ParseException is thrown.
Step 4. LogicManager then calls LevelDownCommand#execute().
Step 5. LevelDownCommand#execute() checks if the indexes correspond to valid students, then the rest of the students
are advanced by one education level. Otherwise, a CommandException is thrown.
Step 6. If the advancing command has been successfully executed, the success message will be displayed.
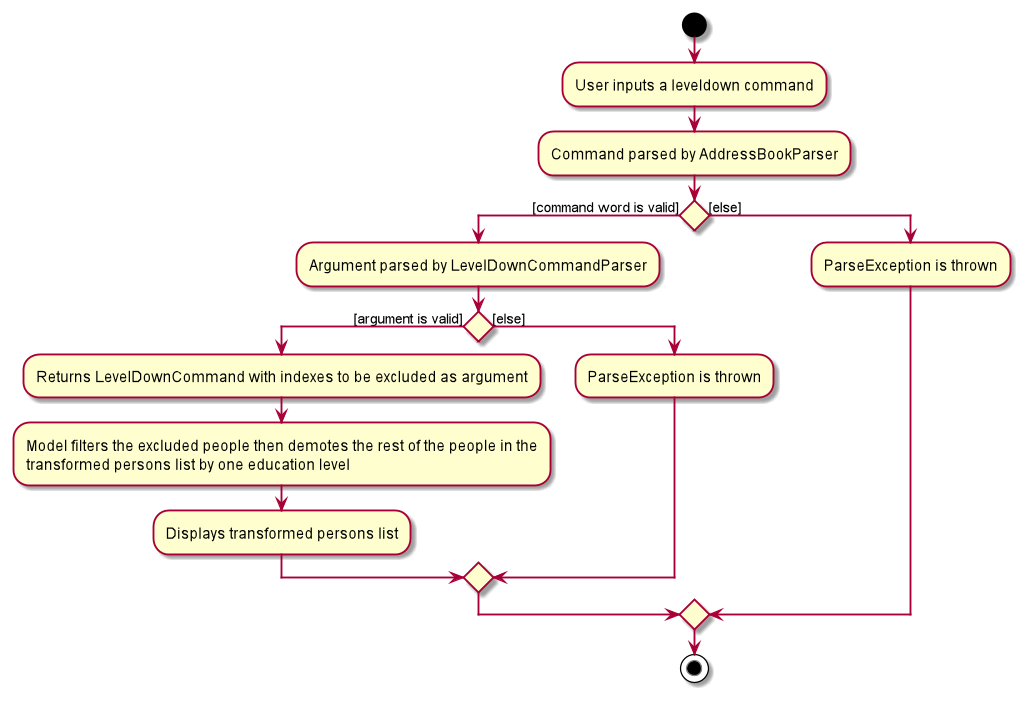
The sequence diagram below shows how the leveldown feature works:
The activity diagram shows the workflow when a leveldown command is executed:
Design consideration:
Aspect: Whether to have a leveldown command at all
-
Alternative 1 (current choice): Have a leveldown command to mass demote students
- Pros: Undoes the levelup command if the user applies the levelup command wrongly
- Cons: No other situation to mass demote all the students
-
Alternative 2: Do not have a leveldown command
- Pros: Less code to maintain
- Cons: If levelup is applied wrongly, reverting all the education levels using the edit command only is time-consuming
Add important date feature
Implementation
The add important date mechanism is facilitated by AddDateCommand and AddDateCommandParser.
AddDateCommand extends Command and implements the following operation:
-
AddDateCommand#execute()— adds the important date consisting of description and details if both are valid, and returns a newCommandResultwith a success message.
AddDateCommandParser implements the Parser interface and implements the following operation:
-
AddDateCommandParser#parse()— parses the user’s input and returns aAddDateCommandif the command format is valid
Given below is an example usage scenario and how the add important date mechanism behaves at each step.
Step 1. The user executes add-date d/math exam dt/2022-03-03 0800 command to add a new important date with a description
math exam and details 2022-03-03 0800 into TutorsPet.
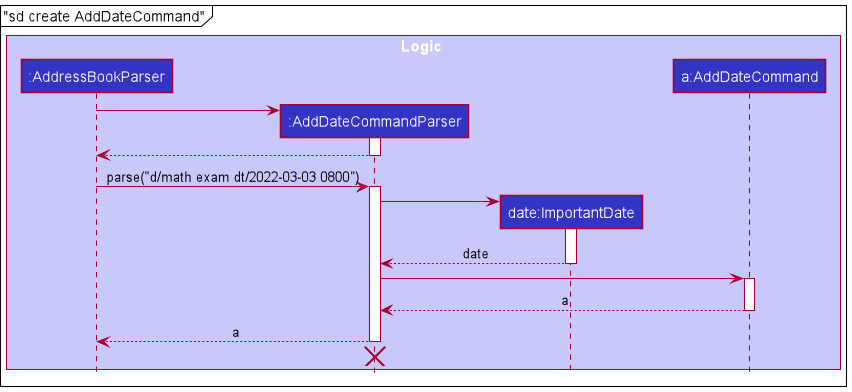
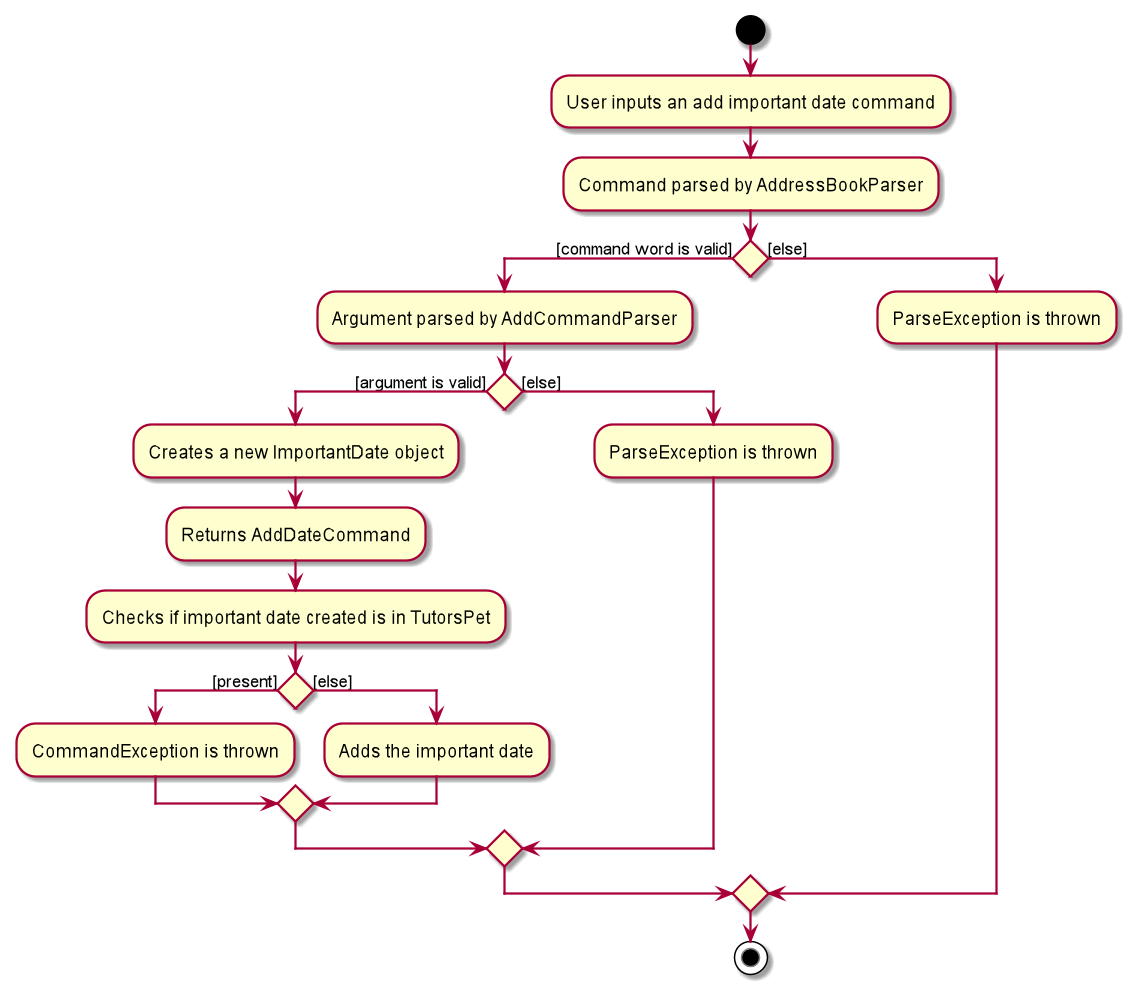
Step 2. The user input is parsed by AddressBookParser, which passes the command’s argument to AddDateCommandParser.
Step 3. AddDateCommandParser creates a new ImportantDate object for the new important date and returns a new AddDateCommand
if the argument is valid. Otherwise, a ParseException is thrown.
Step 4. LogicManager then calls AddDateCommand#execute().
Step 5. AddDateCommand#execute() checks if the important date represented by the ImportantDateobject exists.
If the important date does not exist, it gets added and a new CommandResult is returned.
Otherwise, a CommandException is thrown.
Step 6. If the add important date command has been successfully executed, the success message will be displayed.
The sequence diagram below shows how the add-date feature works:

The activity diagram shows the workflow when an add-date command is executed:
Design consideration:
Aspect: Whether to allow important dates with the same description but different details
-
Alternative 1 (current choice): Important dates with the same description are considered to be duplicates.
- Pros: Each important date is unique, user will not be confused by dates with the same description but different details.
- Cons: User might want to add in an important date with the same description but different details due to the recurring nature of the event that is associated with the date. User will then have to change the description for it to be added in.
-
Alternative 2: Important dates with the same description but different details can be added in.
- Pros: More convenient for the user as it allows user to input recurring important dates in advance, with the same description.
- Cons: May cause confusion if date with the same description is added by accident by the user.
Delete important date feature
Implementation
The delete important date mechanism is facilitated by DeleteDateCommand and DeleteDateCommandParser.
DeleteDateCommand extends Command and implements the following operation:
-
DeleteDateCommand#execute()— deletes the important date at the given index if the index is valid, and returns a newCommandResultwith a success message.
DeleteDateCommandParser implements the Parser interface and implements the following operation:
-
DeleteDateCommandParser#parse()— parses the user’s input and returns aDeleteDateCommandif the command format is valid
Given below is an example usage scenario and how the delete important date mechanism behaves at each step.
Step 1. The user executes delete-date 1 command to delete the 1st important date in TutorsPet, according to the date and time of the important date.
Step 2. The user input is parsed by AddressBookParser, which passes the command’s argument to DeleteDateCommandParser.
Step 3. DeleteDateCommandParser returns a new DeleteDateCommand if the argument is valid. Otherwise, a ParseException is thrown.
Step 4. LogicManager then calls DeleteDateCommand#execute().
Step 5. DeleteDateCommand#execute() checks if the important date specified exists. If the important date exists, it gets deleted and
a new CommandResult is returned. Otherwise a CommandException is thrown.
Step 6. If the delete important date command has been successfully executed, the success message will be displayed.
The sequence diagram below shows how the delete-date feature works:
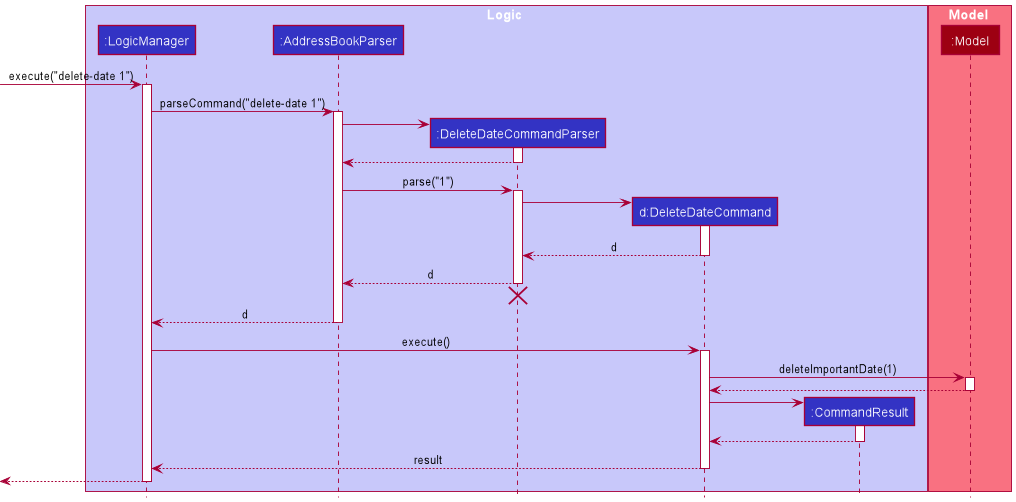
The activity diagram shows the workflow when a delete-date command is executed:
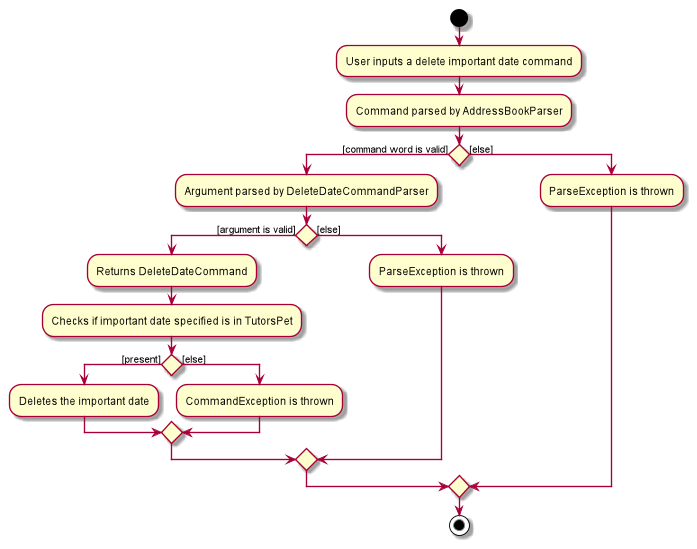
Design consideration:
Aspect: Whether to implement deleting of an important date by entering the index or details of the date
-
Alternative 1 (current choice): Implement deleting of an important date by having the user enter the index of the important date
- Pros: This keeps the command short, user does not have to spend too much time typing out the details.
- Cons: User will have to delete the important dates one by one even if they have the same details and are no longer needed since the dates have passed.
-
Alternative 2: Implement deleting of an important date by having the user enter the details of the important date
- Pros: User can delete all important dates with the same details at once, this can be useful in deleting important dates that have passed.
- Cons: User might have several important dates with the same details, yet only want to delete one of it. By deleting all those with the same details, the user will then have to manually add back all the other important dates that he/she wants.
List important dates feature
Implementation
The list important dates mechanism is facilitated by ImportantDatesCommand, MainWindow and ImportantDatesWindow.
ImportantDatesCommand extends Command and implements the following operation:
-
ImportantDatesCommand#execute()— lists the important dates stored in TutorsPet sorted according to the details (time and date), and returns a newCommandResultwith a success message.
MainWindow extends UiPart
-
MainWindow#executeCommand()— callsLogicManager#execute()to execute user command. -
MainWindow#handleImportantDates()— callsImportantDatesWindow#show()to open a new important dates window if it is not opened yet. Otherwise, callImportantDatesWindow#focus()to focus on the already opened important dates window.
ImportantDatesWindow extends UiPart<Stage> and implements the following relevant operations:
-
ImportantDatesWindow#show()— adds all important dates in TutorsPet to the important dates UI, and opens up a new important dates window. -
ImportantDatesWindow#focus()— focuses on already opened important dates window.
Given below is an example usage scenario and how the list important dates mechanism behaves at each step.
Step 1. All important dates are stored in an ObservableList named internalList. There is an additional ObservableList named
transformedImportantDates has the important dates sorted according to the dates’ details.
Step 2. The user executes add-date d/math exam dt/2023-04-03 0800 command to add in an important date with details 2023-04-3 0800.
The add-date command calls Model#addImportantDate() which adds the important date to the internalList, and updates transformedImportantDates.
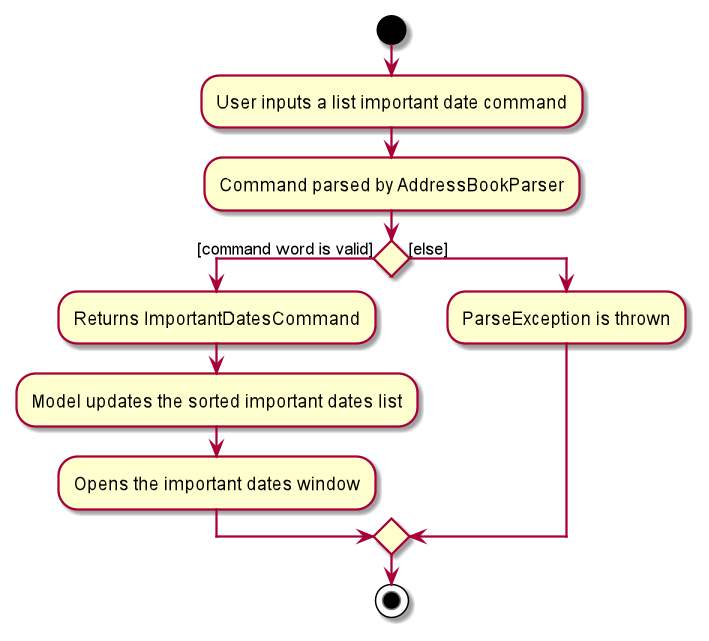
Step 3. The user now executes list-date command to open up the important dates window. The command is parsed by AddressBookParser, which returns a new ImportantDatesCommand.
Step 4. LogicManager then calls ImportantDatesCommand#execute().
Step 5. ImportantDatesCommand#execute() calls Model#updateSortedImportantDatesList() and returns a new CommandResult
whose showImportantDates boolean value is set to true.
Step 6. MainWindow#executeCommand() then checks the value of showImportantDates, and since it is true,
MainWindow#handleImportantDates() is called to open the important dates window. ImportantDatesWindow#show() is called, which will
create a dateListPanel, containing the ObservableList of important dates.
Step 7. If the list important dates command has been successfully executed, the success message will be displayed.
The sequence diagram below shows how the list-date feature works:
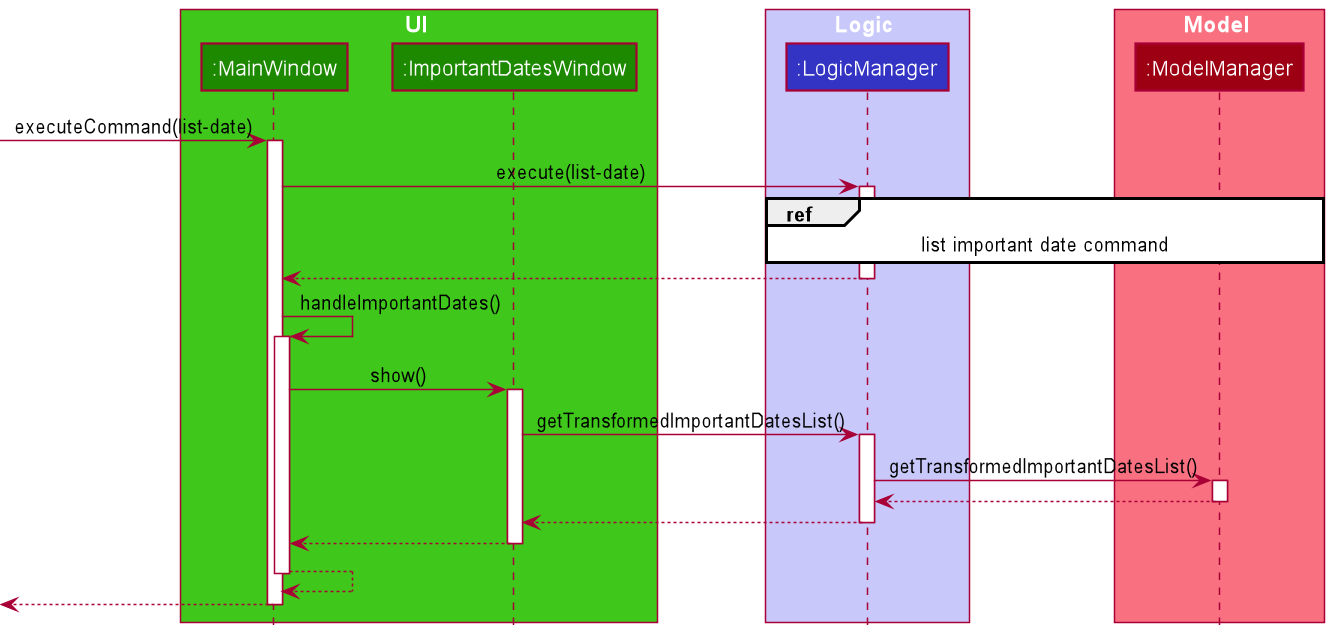
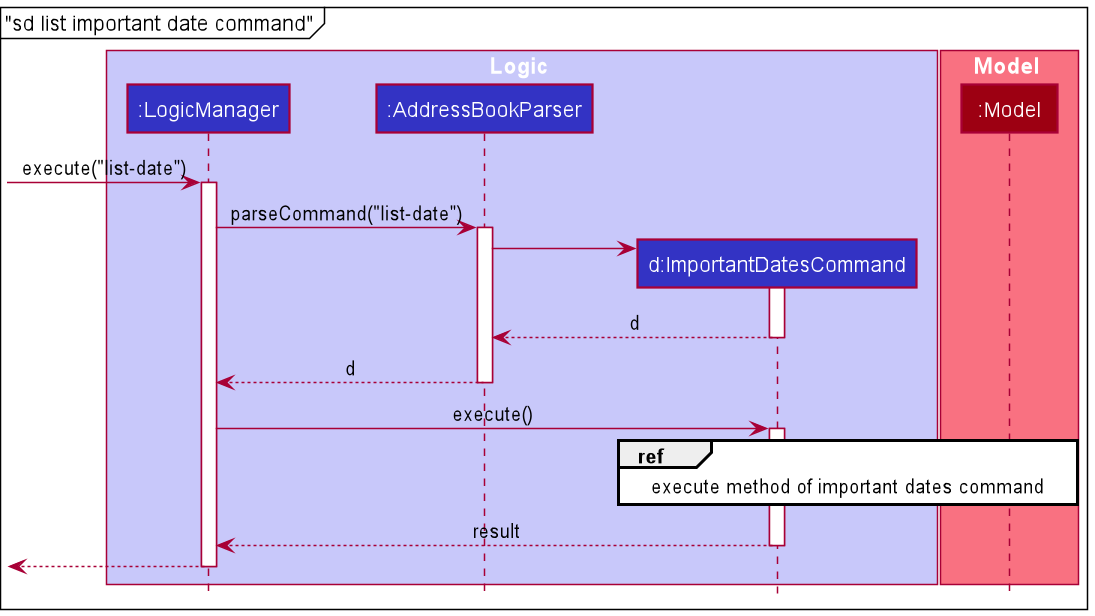
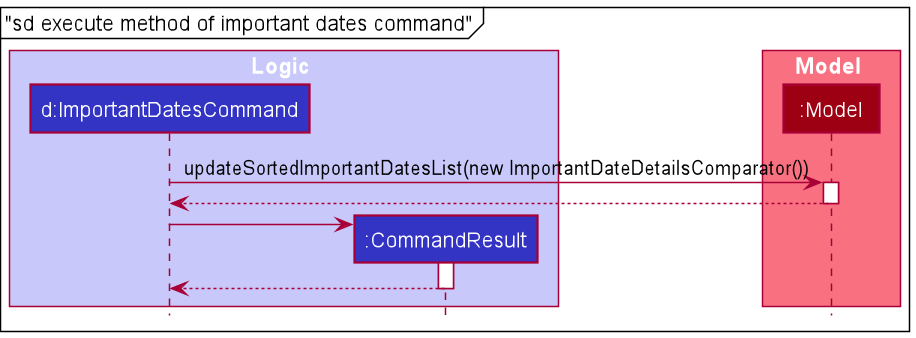
The activity diagram shows the workflow when a list-date command is executed:
Design consideration:
Aspect: Whether to display the list as a separate window or within the main window.
-
Alternative 1 (current choice): Displays the list as a separate window.
- Pros: The main window would not be cluttered with too much information.
- Cons: Users might not like having many windows open.
-
Alternative 2: Displays the list within the main window.
- Pros: Users do not have to switch between windows when they want to enter commands to modify the important dates in the list.
- Cons: Having too much information in the main window might appear to be overwhelming, especially for the new users.
Schedule feature
Implementation
The schedule mechanism is facilitated by ScheduleCommand, MainWindow and ScheduleWindow.
ScheduleCommand extends Command. It implements the following operation:
-
ScheduleCommand#execute()— displays all of the student contacts in TutorsPet. Returns a newCommandResultwith boolean value ofshowScheduleset astrue.
MainWindow extends UiPart<Stage>. It implements the following relevant operations:
-
MainWindow#executeCommand()— callsLogicManager#execute()to execute user command. -
MainWindow#handleSchedule()— callsScheduleWindow#show()to open a new schedule window if it is not opened yet. Otherwise, callScheduleWindow#focus()to focus on the already opened schedule window.
ScheduleWindow extends UiPart<Stage>. It implements the following relevant operations:
-
ScheduleWindow#show()— adds all lessons in TutorsPet to the schedule UI, and opens up a new schedule window. -
ScheduleWindow#focus()— focuses on already opened schedule window.
Given below is an example usage scenario and how the schedule mechanism behaves at each step.
Step 1. All lessons are stored in an ObservableList named internalList. There are additional seven separate ObservableList for lessons
for each day of the week, which are sorted by day and time. For example transformedMondayList and transformedSundayList.
Step 2. The user executes add n/Mary p/98765432 le/monday 1000 command to add in a student contact whose lesson
is on monday 1000. The add command calls Model#addPersonToLesson() which adds the lessons to the internalList,
and updates the transformedMondayList.
Step 3. The user executes delete 2 command to delete the 2nd person in TutorsPet. The delete command calls
Model#removePersonFromLesson() which removes the lesson from the internalList if the contact to be deleted is the
only person in that lesson. If the lesson to be removed is on a Tuesday, transformedTuesdayList will be updated accordingly.
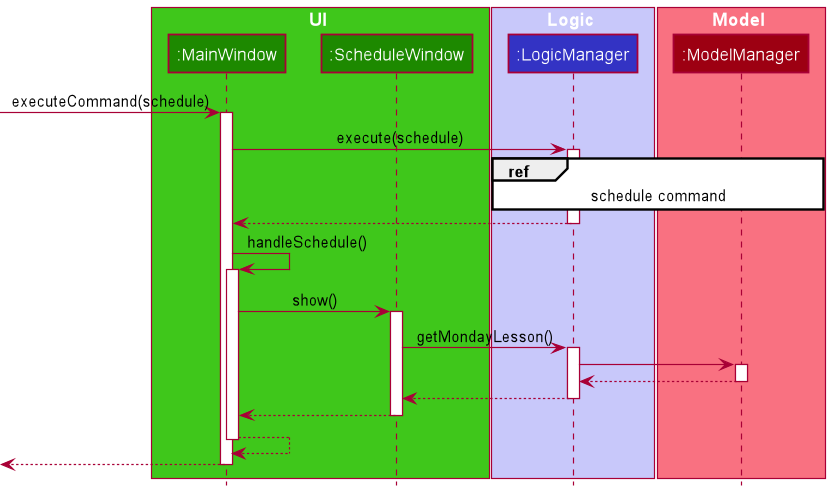
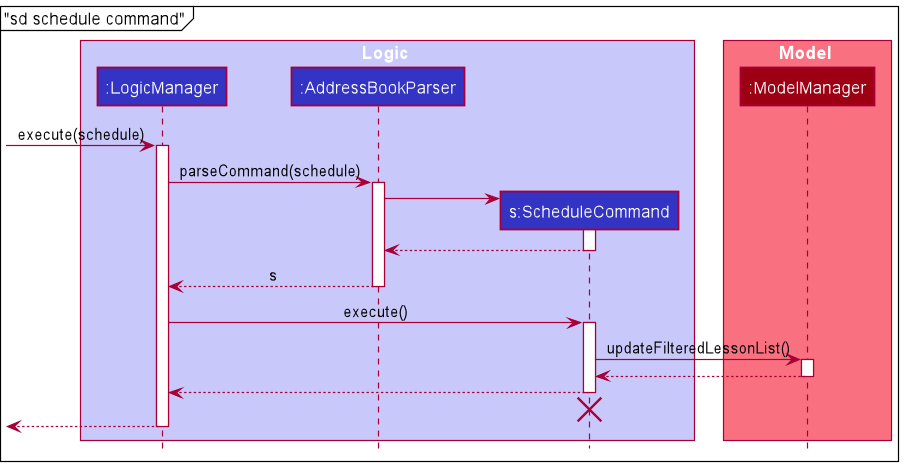
Step 4. The user now wants to look at the schedule and hence executes schedule command to open up the schedule window.
The schedule command will return a new CommandResult whose showSchedule boolean value is set to true.
MainWindow#executeCommand() then checks the value of showSchedule, and since it is true,
MainWindow#handleSchedule() is called to open the schedule window. ScheduleWindow#show() is called, which will
create a LessonListPanel for each day, each containing the ObservableList of lessons for that day.
The sequence diagram below shows how the schedule feature works:
Step 5. The user then executes detail 1 command that does not modify the internalList or the seven separate ObservableList
of lessons for each day of the week. The detail command instead modifies another ObservableList. Thus, the schedule
window continues to display the correct list of lessons for each day.
Design consideration:
Aspect: Whether to use a separate ObservableList for each day of the week.
-
Alternative 1 (current choice): Use a separate ObservableList for each day.
- Pros: Results in real time update of schedule.
- Cons: Takes up more space, more tedious to manage since there are seven different lists.
-
Alternative 2: Use only one ObservableList
- Pros: Less prone to errors, easier to manage.
- Cons: Schedule will not be updated in real time. For example, when schedule window is opened and user adds or edits a contact, the change will not be reflected real time on the opened schedule window. It is only reflected when the schedule window is closed and reopened.
Documentation, logging, testing, configuration, dev-ops
Appendix: Requirements
Product scope
Target user profile: Private tuition teacher
- has a need to manage a significant number of student contacts
- has to plan lessons based on each student’s profile
- is comfortable carrying a laptop around
- can type fast
Value proposition: manage many contacts with a lot of different details
User stories
Priorities: High (must have) - * * *, Medium (nice to have) - * *, Low (unlikely to have) - *
| Priority | As a … | I want to … | So that … |
|---|---|---|---|
* * * |
new user | see usage instructions | I can refer to instructions when I forget how to use the App |
* * * |
user | add new student’s contact | I can store information on a student |
* * * |
user | delete a student’s contact | I can remove entries that I no longer need and reduce cluttering |
* * * |
user | edit a student’s contact | I can update the contact book when a student’s details has changed |
* * |
user | keep track of my students’ exam dates | I can plan my lessons according to their examination dates |
* * |
user | find a student by name | I can locate details of students without having to go through the entire list |
* * |
user | find a student by school | I can plan my lesson/schedules according to their school’s curriculum |
* * |
user | find a student by subject | I can distinguish my students if I am teaching more than 1 subject |
* * |
user | sort students by lesson days | I can see my schedule for the week |
* * |
user | easily check the current education level of my students | I can prepare the correct lesson material for them |
* * |
user | easily access guardians’ contact | I can quickly reach them in case of any emergencies or sudden changes |
* * |
expert user | access my most commonly searched contacts quicker | I can save time |
* * |
expert user with many new students | increase the speed of inputting my students’ detail | I can save time |
* |
user | mass update all student levels | I can keep my contacts up to date at the start of a new year |
* |
expert user | add customized subjects to contacts | I can be able to access each group of students more easily |
* |
expert user | attach remarks to contacts | I can remember details that might not be covered in the original program |
* |
expert user | be able to check a student’s progress | I know what materials to bring to the student’s house |
* |
lazy user | access certain functions with shortcuts instead of typing long keywords | I can save time when trying to retrieve students information |
* |
user | hide private contact details | I can minimize chance of someone else seeing them by accident |
* |
forgetful user | reset my password | I can retrieve my account even when I forget my password |
Use cases
(For all use cases below, the System is the TutorsPet and the Actor is the user, unless specified otherwise)
Use case: UC01 - Add a new student contact
MSS
- User keys in the student’s contact to be added
-
TutorsPet shows the added student into the list
Use case ends.
Extensions
-
1a. The given details are in an incorrect format.
-
1a1. TutorsPet shows an error message.
Use case ends.
-
-
1b. Details are in correct format, but the name already exists in TutorsPet.
-
1b1. TutorsPet displays a message to notify the duplicate name and ask user whether to proceed with
yorn. -
1b2. User enters
y.
Use case resumes from step 2.
-
-
1c. Details are in correct format, but the phone already exists in TutorsPet.
- 1c1. TutorsPet shows an error message.
Use case ends.
- 1c1. TutorsPet shows an error message.
Use case: UC02 - Editing an existing student contact
MSS
- User requests to list contacts
- TutorsPet shows a list of students’ contact
- User requests to edit a specific contact from the list
-
TutorsPet edits the selected contact
Use case ends.
Extensions
-
1a. The given details is in an incorrect format.
-
1a1. TutorsPet shows an error message.
Use case ends.
-
-
2a. The list is empty.
Use case ends.
-
3a. The given index is invalid.
-
3a1. TutorsPet shows an error message.
Use case resumes at step 2.
-
Use case: UC03 - Delete a student contact
MSS
- User requests to list contacts
- TutorsPet shows a list of students’ contact
- User requests to delete a specific contact from the list
-
TutorsPet deletes the student
Use case ends.
Extensions
-
2a. The list is empty.
Use case ends.
-
3a. The given index is invalid.
-
3a1. TutorsPet shows an error message.
Use case resumes at step 2.
-
Use case: UC04 - Display a student contact details
MSS
- User requests to list student contacts.
- TutorsPet shows a list of student contacts.
- User requests to display a specific student contact from the list.
-
TutorsPet display the specified student contact in the details panel.
Use case ends.
Extensions
-
1a. The list is empty
Use case ends.
-
3a. The given index of the student contact in the list is invalid.
-
3a1. TutorsPet shows an error message.
Use case resumes from step 2.
-
Use case: UC05 - Search for a student contact
MSS
- User enters the specified keyword to be searched.
- TutorsPet shows a list of searched students.
Extensions
-
1a. The given search command is in an incorrect format.
-
1a1. TutorsPet shows an error message.
Use case ends.
-
-
1b. The given search command has two of the same parameters.
-
2b1. TutorsPet executes the command while taking in the last occurrence of the parameters only.
Use case resumes at step 2.
-
-
3a. The search result list is empty.
Use case ends.
Use case: UC06 - Sort the list view
MSS
- User requests to sort the list with a particular criteria
-
TutorsPet sorts the list by the criteria and indicates success.
Use case ends.
Extensions
-
1a. The user uses an invalid sorting criteria
-
1a1. TutorsPet shows an error message.
Use case ends.
-
-
1b. The given sort command has more than one valid sorting criteria specified.
-
1b1. TutorsPet executes the command while taking in the last occurrence of the parameters only.
Use case resumes at step 2.
-
Use case: UC07 - Increase level of all students
MSS
- User enters levelup command into command prompt
-
TutorsPet increases all students’ levels by one and indicates success.
Use case ends.
Extensions
-
1a. The user enters levelup command and excludes some students
-
1a1. TutorsPet increases all students’ levels by one except the specified students and indicates success.
Use case resumes at step 2.
-
-
1b. The user enters levelup command and excludes a student using an invalid index
-
1b1. TutorsPet shows an error message.
Use case ends.
-
Use case: UC08 - Decrease level of all students
MSS
- User enters leveldown command into command prompt
-
TutorsPet decreases all students’ levels by one and indicates success.
Use case ends.
Extensions
-
1a. The user enters leveldown command and excludes some students
-
1a1. TutorsPet decreases all students’ levels by one except the specified students and indicates success.
Use case resumes at step 2.
-
-
1b. The user enters leveldown command and excludes a student using an invalid index
-
1b1. TutorsPet shows an error message.
Use case ends.
-
Use case: UC09 - Add a new important date
MSS
- User keys in the important date to be added.
-
TutorsPet adds the important date and indicates success.
Use case ends.
Extensions
-
1a. The given description or details is in an incorrect format.
-
1a1. TutorsPet shows an error message.
Use case ends.
-
-
1b. There exists an important date in TutorsPet with the same description.
-
1b1. TutorsPet shows an error message.
Use case ends.
-
Use case: UC10 - Deletes an important date
MSS
- User requests to list important dates.
- TutorsPet shows a list of important dates.
- User requests to delete a specific important date from the list.
-
TutorsPet deletes the important date.
Use case ends.
Extensions
-
1a. The list is empty
Use case ends.
-
3a. The given index of the important date is invalid.
-
3a1. TutorsPet shows an error message.
Use case resumes from step 2.
-
Use case: UC11 - Lists important dates
MSS
- User requests to list important dates.
-
TutorsPet shows a list of important dates.
Use case ends.
Extensions
-
1a. The given command is in an invalid format.
-
1a1. TutorsPet shows an error message.
Use case ends.
-
Use case: UC12 - Opens schedule window
MSS
- User requests to open weekly schedule window.
-
TutorsPet opens the window schedule.
Use case ends.
Extensions
-
1a. The given command is in an invalid format.
-
1a1. TutorsPet shows an error message.
Use case ends.
-
-
1b. The schedule window is already opened.
-
1b1. TutorsPet switches focus to the schedule window.
Use case ends.
-
Use case: UC13 - Clears all entries contact
MSS
- User enters clears all entries contact command
-
TutorsPet clears all the contact in list
Use case ends.
Extensions
-
1a. The given details is in an incorrect format.
-
1a1. TutorsPet shows an error message.
Use case ends.
-
Use case: UC14 - Exit TutorsPet
MSS
- User enters exit into command prompt
-
TutorsPet saves the current contact in the list and exits.
Use case ends.
Extensions
-
1a. The given details is in an incorrect format.
-
1a1. TutorsPet shows an error message.
Use case resumes at step 2.
-
Non-Functional Requirements
- Should work on any mainstream OS as long as it has Java
11or above installed. - Should be able to hold up to 1000 persons without a noticeable sluggishness in performance for typical usage.
- A user with above average typing speed for regular English text (i.e. not code, not system admin commands) should be able to accomplish most of the tasks faster using commands than using the mouse.
- Should work without requiring an installer.
- Should not depend on remote server.
- Everything should be packaged into a single JAR file.
- JAR file should not exceed 100MB.
- System should be usable and understandable by a novice.
- System should be able to run even if the data file has errors arising from a user manually editing it.
- Users should be comfortable with the system even after not using it for a period of time.
- System should be able to store up to 500 contacts.
- System should be able to function if a user overwrites the data file with another data file that is named the same.
{More to be added}
Glossary
- Private tuition teachers: Freelance tuition teachers not belonging to any organisations
- Mainstream OS: Windows, Linux, Unix, OS-X
- Private contact detail: A contact detail that is not meant to be shared with others
- Novice: A user that is new to using TutorsPet
- MSS: Main Success Scenario
Appendix: Instructions for manual testing
Given below are instructions to test the app manually.
Launch and shutdown
-
Initial launch
-
Download the jar file and copy into an empty folder
-
Double-click the jar file Expected: Shows the GUI with a set of sample contacts. The window size may not be optimum.
-
-
Saving window preferences
-
Resize the window to an optimum size. Move the window to a different location. Close the window.
-
Re-launch the app by double-clicking the jar file.
Expected: The most recent window size and location is retained.
-
-
{ more test cases … }
Adding a student
Add a student with his/her details
-
Test case:
add n/John
Expected: The student cannot be added.A student’s name and phone are compulsory details that must be provided. Here, the phone number is missing.
-
Test case:
add n/John p/aaaaa
Expected: The student cannot be added.Phone number has the invalid format.
-
Test case:
add n/John Doe p/87438807
Expected: Assume that phone number is already owned by another student in TutorsPet.The new student cannot be added because each student must have a unique phone number.
-
Test case:
add n/Alex Yeoh p/12345678
Expected: Assume that the name is the same as another student in TutorsPet.There will be a message notifying the user about the duplicate name.
If the user proceeds to type
y, the student can be added. If the user proceeds to typen, the student will not be added. -
Test case:
add n/John Doe p/98765432 s/Clementi Secondary School e/johnd@example.com a/311, Clementi Ave 2, #02-25 gn/Helen Doe gp/98765431 lv/sec3 t/math t/chem le/monday 1300
Expected: Assume that both the name and the phone are unique.The student can be successfully added with all the details stored in TutorsPet.
Editing a student
- Edit details of an existing student listed the first in TutorsPet
-
Prerequisites: List all students using the
listcommand. There is at least 1 student in the list. -
Test case:
edit s/ABC Secondary School gn/John Lee
Expected: No student can be edited.
There is an error message to notify the incorrect command format. -
Test case:
edit 0 s/ABC Secondary School gn/John Lee
Expected: No student can be edited.
There is an error message to notify the invalid index. -
Test case:
edit 1 n/John Doe
Expected: Assume there is another student named John Doe.
There will be a message notifying the user about the duplicate name.
If the user proceeds to typey, the name of the first studnet in the list is edited. If the user proceeds to typen, the student will not be edited. -
Test case:
edit 1 s/
Expected: The edit command is invalid.
The student’s school cannot be edited with an empty name. -
Test case:
edit 1 t/
Expected: The subjects of the first student is removed. -
Test case:
edit 1 s/ABC Secondary School gn/John Lee
Expected: The school name and guardian’s name of the first student is edited. -
Test case:
edit 1 t/bio t/lit
Expected: The subjects of the student are edited to biology and literature.
-
Deleting a student
-
Deleting a student while all students are being shown
-
Prerequisites: List all students using the
listcommand. Multiple students in the list. -
Test case:
delete 1
Expected: First contact is deleted from the list. Details of the deleted contact shown in the status message. Timestamp in the status bar is updated. -
Test case:
delete 0
Expected: No student is deleted. Error details shown in the status message. Status bar remains the same. -
Other incorrect delete commands to try:
delete,delete x,...(where x is larger than the list size)
Expected: Similar to previous.
-
Viewing a student contact details
-
Viewing a student contact details while all students are being shown
-
Prerequisites: List all students using the
listcommand. Multiple students in the list. -
Test case:
detail 1
Expected: Details of the first contact from the list is displayed on the Contact Detail panel. -
Test case:
detail 0
Expected: No student detail is displayed. Error details shown in the status message. Status bar remains the same. -
Other incorrect delete commands to try:
detail,detail x,...(where x is larger than the list size)
Expected: Similar to previous.
-
Searching for a student
- Searching for a student while all students are being shown.
- Prerequisites: List all students using the
listcommand. Multiple students in the list. - Test case:
search n/yeoh alex t/math
Expected: Displays a list of students with names (case insensitive)alex yeohoralexoryeoh alexor students with subjectmath. - Test case:
search t/math t/phys
Expected: Displays a list of students with subjectsphys, because only the last occurrence of the parameter will be taken into account. - Test case:
search n/
Expected: No student is displayed. Error details shown in the status message. Status bar remains the same. - Other incorrect search commands to try:
search,search s/,search s/ t/,search x(where x is any keyword)
Expected: Similar to previous.
- Prerequisites: List all students using the
- Searching for a student not displayed while a search result is displayed
- Prerequisites: Search for students using the
search t/mathcommand. Zero to multiple students withmathsubject displayed in the list. - Test case:
search t/phys
Expected: Displays a list of students with subjectphy. - Test case:
search s/xyz
Expected: Displays a list of students with school names withxyz(case insensitive),
- Prerequisites: Search for students using the
Adding an important date
-
Adding an important date while all important dates are being shown
-
Prerequisites: List all important dates using the
list-datecommand. Multiple important dates in the list. -
Test case:
add-date d/math exam dt/2021-11-03 0800
Expected: Adds an important date with the descriptionmath examand details2021-11-03 0800. Details of the added important date is shown in the status message. List is updated. -
Test case:
add-date d/math exam
Expected: No important date is added. Error details shown in the status message. -
Test case:
add-date dt/2021-11-03 0800
Expected: Similar to previous. -
Test case:
add-date d/math exam dt/2021/11/03 8am
Expected: Similar to previous. -
Other incorrect add important date commands to try:
add-date,add-date x,...(where x is the description or details without thed/ordt/prefix)
Expected: Similar to previous.
-
Deleting an important date
-
Deleting an important date while all important dates are being shown
-
Prerequisites: List all important dates using the
list-datecommand. Multiple important dates in the list. -
Test case:
delete-date 1
Expected: First important date is deleted from the list. Details of the deleted important date is shown in the status message. -
Test case:
delete-date 0
Expected: No important date is deleted. Error details shown in the status message. -
Other incorrect delete important date commands to try:
delete-date,delete x,...(where x is larger than the list size, larger than 2147483647 or not a positive integer)
Expected: Similar to previous.
-
Listing all important dates
-
List all important dates.
-
Test case:
list-date 2
Expected: Opens window with a list of important dates. Success details is shown in the status message. -
Incorrect list important date commands include cases where the command entered is not
list-date
-
Viewing the schedule
- Viewing the schedule while all students are being shown.
- Prerequisites: List all students using the
listcommand. Multiple students in the list. - Test case:
schedule
Expected: Opens up the schedule window. - Test case:
schedulexyz
Expected: No schedule window pops up. Error details shown in the status message. Status bar remains the same. - Other incorrect search commands to try:
schedule*,schedulex
Expected: Similar to previous.
- Prerequisites: List all students using the
- Viewing the schedule window while adding or editing student contact.
- Prerequisites: Open up the schedule window using
schedulecommand. All lessons displayed in the schedule window. - Test case: Enter
add n/Sara p/91111111 le/monday 1800to add a contact named Sara with a lesson on Monday 1800. Then enterschedule.
Expected: Focuses on the schedule window is updated with a new lesson on Monday 1800, andSaraname is there. - Test case: Enter
listto display all the contacts. Enteredit X le/monday 2000(X is the index of Sara’s contact) to edit the lesson to Monday 2000. Then enterschedule.
Expected: Focuses on the schedule window which is updated with a new lesson withSaraon Monday 2000, and the lesson on Monday 1800 is removed.
- Prerequisites: Open up the schedule window using
- Viewing the schedule window while schedule window is already opened.
- Prerequisites: Open up the schedule window using
schedulecommand. Change focus to TutorsPet window. - Test case:
schedule
Expected: Focuses back on the schedule window.
- Prerequisites: Open up the schedule window using
Saving data
- Dealing with missing/corrupted data files
- Make sure there are three files, namely: ./data/addressbook.json, ./data/datesbook.json and ./data/lessonbook.json.
If not, open the app, and close the app. - Open all three files in a text editor.
- Remove the ending } character of the JSON file and save the file.
- Launch the app by running java -jar tutorspet.jar in the console.
Expected: TutorsPet opened should have no entries.
- Make sure there are three files, namely: ./data/addressbook.json, ./data/datesbook.json and ./data/lessonbook.json.